NIST SPECIAL PUBLICATION 1800-4C
Mobile Device Security
Cloud and Hybrid Builds
Volume C:
How-to Guides
Joshua Franklin
National Institute of Standards and Technology
Information Technology Laboratory
Kevin Bowler
Christopher Brown
Spike E. Dog
Sallie Edwards
Neil McNab
Matthew Steele
The MITRE Corporation
McLean, VA
February 2019
This publication is available free of charge from: https://doi.org/10.6028/NIST.SP.1800-4
The original draft of this publication is available free of charge from: https://nccoe.nist.gov/projects/building-blocks/mobile-device-security

DISCLAIMER
Certain commercial entities, equipment, products, or materials may be identified in this document in order to describe an experimental procedure or concept adequately. Such identification is not intended to imply recommendation or endorsement by NIST or NCCoE, nor is it intended to imply that the entities, equipment, products, or materials are necessarily the best available for the purpose.
National Institute of Standards and Technology Special Publication 1800-4C, Natl. Inst. Stand. Technol. Spec. Publ. 1800-4C, 109 pages, February 2019, CODEN: NSPUE2
FEEDBACK
As a private-public partnership, we are always seeking feedback on our Practice Guides. We are particularly interested in seeing how businesses apply NCCoE reference designs in the real world. If you have implemented the reference design, or have questions about applying it in your environment, please email us at mobile-nccoe@nist.gov.
All comments are subject to release under the Freedom of Information Act (FOIA).
National Cybersecurity Center of Excellence
National Institute of Standards and Technology
100 Bureau Drive
Mailstop 2002
Gaithersburg, MD 20899
Email: nccoe@nist.gov
NATIONAL CYBERSECURITY CENTER OF EXCELLENCE
The National Cybersecurity Center of Excellence (NCCoE), a part of the National Institute of Standards and Technology (NIST), is a collaborative hub where industry organizations, government agencies, and academic institutions work together to address businesses’ most pressing cybersecurity issues. This public-private partnership enables the creation of practical cybersecurity solutions for specific industries as well as for broad, cross-sector technology challenges. Through consortia under Cooperative Research and Development Agreements (CRADAs), including technology partners — from Fortune 50 market leaders to smaller companies specializing in IT security — the NCCoE applies standards and best practices to develop modular, easily adaptable example cybersecurity solutions using commercially available technology. The NCCoE documents these example solutions in the NIST Special Publication 1800 series, which maps capabilities to the NIST Cyber Security Framework and details the steps needed for another entity to recreate the example solution. The NCCoE was established in 2012 by NIST in partnership with the State of Maryland and Montgomery County, Md.
To learn more about the NCCoE, visit https://nccoe.nist.gov. To learn more about NIST, visit https://www.nist.gov.
NIST CYBERSECURITY PRACTICE GUIDES
NIST Cybersecurity Practice Guides (Special Publication Series 1800) target specific cybersecurity challenges in the public and private sectors. They are practical, user-friendly guides that facilitate the adoption of standards-based approaches to cybersecurity. They show members of the information security community how to implement example solutions that help them align more easily with relevant standards and best practices and provide users with the materials lists, configuration files, and other information they need to implement a similar approach.
The documents in this series describe example implementations of cybersecurity practices that businesses and other organizations may voluntarily adopt. These documents do not describe regulations or mandatory practices, nor do they carry statutory authority.
ABSTRACT
This document proposes a reference design on how to architect enterprise-class protection for mobile devices accessing corporate resources. The example solutions presented here can be used by any organization implementing an enterprise mobility management solution. This project contains two distinct builds: cloud and hybrid. The cloud build makes use of cloud-based services and solutions, while the hybrid build achieves the same functionality but hosts the data and services within an enterpriseʼs own infrastructure. The example solutions and architectures presented here are based upon standards-based, commercially available products.
KEYWORDS
mobile; mobile device; mobile device management; mobility management; mobile security
ACKNOWLEDGMENTS
We are grateful to the following individuals for their generous contributions of expertise and time.
| Name | Organization |
|---|---|
| Rick Engle | Microsoft |
| Kevin Fiftel | Intel |
| Paul Fox | Microsoft |
| Steve Kruse | Symantec |
| Tim LeMaster | Lookout |
| Nate Lesser | NIST National Cybersecurity Center of Excellence |
| Adam Madlin | Symantec |
| Kevin McPeak | Symantec |
| Rene Peralta | Microsoft |
| Atul Shah | Microsoft |
| Steve Taylor | Intel |
The Technology Partners/Collaborators who participated in this build submitted their capabilities in response to a notice in the Federal Register. Respondents with relevant capabilities or product components were invited to sign a Cooperative Research and Development Agreement (CRADA) with NIST, allowing them to participate in a consortium to build the example solutions. We worked with ...
| Technology Partner/Collaborator | Build Involvement |
|---|---|
| Intel | Lenovo Miix 2.8 Mobile Device |
| Lookout | Enterprise Mobility Management Application |
| Microsoft | Microsoft Cloud Service, Company Portal, Intune, Office 365 Enterprise E3, Outlook & Community Portal Mobile Applications, System Center 2012 R2 Configuration Manager SP1, Windows Phone Operating System |
| Symantec | X.509 Certificate |
List of Figures
Figure 2-1 Cloud Build Process
Figure 3-1 Hybrid Build Process
Figure 3-2 Detailed Architecture
Figure 3-3 Detailed Architecture with Network Addresses and Host Names
Figure 3-4 List of Configured Interfaces
Figure 3-9 Management Firewall Rules
List of Tables
Table 1-1 Typographic Conventions
Table 2-1 Cloud Build Components
Table 3-1 Legend for Detailed Architecture Diagrams
Table 3-2 Hybrid Build Components
Table 3-3 On-Premise Components of the Hybrid Build
1. Introduction
The following volumes of this guide show information technology (IT) professionals and security engineers how we implemented the example solutions to the challenge of securing email, contacts, and calendaring in mobile devices. We cover all the products that we employed in this reference design. We do not recreate the product manufacturer’s documentation, which is presumed to be widely available. Rather, these volumes show how we incorporated the products together in our environment.
NOTE: These are not comprehensive tutorials. There are many possible service and security configurations for these products that are out of scope for this reference design.
1.1. Practice Guide Structure
This National Institute of Standards and Technology (NIST) Cybersecurity Practice Guide demonstrates standards-based reference designs and provides users with the information they need to replicate this approach to mobile device security. This reference design is modular and can be deployed in whole or in part.
This guide contains three volumes:
NIST SP 1800-4A: Executive Summary
NIST SP 1800-4B: Approach, Architecture, and Security Characteristics – what we built and why
NIST SP 1800-4C: How-To guides – instructions for building the example solution (you are here)
Depending on your role in your organization, you might use this guide in different ways:
Business decision makers, including chief security and technology officers, will be interested in the Executive Summary (NIST SP 1800-4A), which describes the following topics:
challenges enterprises face in implementing and using mobile devices
example solutions built at the NCCoE
benefits of adopting the example solutions
Technology or security program managers who are concerned with how to identify, understand, assess, and mitigate risk will be interested in NIST SP 1800-4B, which describes what we did and why. The following sections will be of particular interest:
Section 3.4.3, Risk Assessment, provides a detailed description of the risk analysis we performed
Section 3.4.4, Security Characteristics and Controls Mapping, maps the security characteristics of this example solution to cybersecurity standards and best practices
You might share the Executive Summary, NIST SP 1800-4A, with your leadership team members to help them understand the importance of adopting standards-based enterprise mobility management (EMM) approaches to protect your organization’s digital assets.
IT professionals who want to implement an approach like this will find the whole practice guide useful. You can use the How-To portion of the guide, NIST SP 1800-4C, to replicate all or parts of the build created in our lab. The How-To guide provides specific product installation, configuration, and integration instructions for implementing the example solutions. We do not re-create the product manufacturers’ documentation, which is generally widely available. Rather, we show how we incorporated the products together in our environment to create an example solution.
This guide assumes that IT professionals have experience implementing security products within the enterprise. While we have used a suite of commercial products to address this challenge, this guide does not endorse these particular products. Your organization can adopt this solution or one that adheres to these guidelines in whole, or you can use this guide as a starting point for tailoring and implementing parts of a solution that would support the deployment of mobile devices and the corresponding business processes. Your organization’s security experts should identify the products that will best integrate with your existing tools and IT system infrastructure. We hope that you will seek products that are congruent with applicable standards and best practices.
1.2. Build Overview
The NCCoE constructed the Mobile Device Security building block by using a virtualized environment and a physical wireless access point. The servers hosted by the virtualized environment were built to satisfy the hardware specifications of the specific software components in a small test environment (hard drive capacity, memory, etc.). The wireless access point was configured to use a closed lab network rather than directly internet connected. The mobile devices used in the build were configured to use this access point to simulate usage outside the traditional corporate network boundaries. Readers of this guide should assess the hardware needs of their environment carefully before implementation. Further, this build requires internet accessibility for some of the on-premise components that connect to commercial cloud services. We recommend configuring your firewall or other equipment to allow only internet access from on-premise systems to a specific internet protocol (IP) space provided by your cloud provider.
Finally, this document makes heavy use of screenshots from cloud services set up through a web browser. The reader should be aware that the rapid development of cloud services may cause some differences in what is presented here with screenshots and what the implementer experiences. Refer to vendor documentation to address significant variations.
1.3. Typographic Conventions
The following table presents typographic conventions used in this volume.
Table 1-1 Typographic Conventions
| Typeface/Symbol | Meaning | Example | |
|---|---|---|---|
| Italics | filenames and pathnames, references to documents that are not hyperlinks, new terms, and placeholders | For detailed definitions of terms, see the NCCoE Glossary. | |
| Bold | names of menus, options, command buttons and fields | Choose File > Edit. | |
Monospace
|
command-line input, on-screen computer output, sample code examples, status codes | mkdir
|
|
Monospace Bold
|
command-line user input contrasted with computer output | service sshd start
|
|
| blue text | link to other parts of the document, a web URL, or an email address | All publications from NIST’s National Cybersecurity Center of Excellence are available at https://www.nccoe.nist.gov. | |
2. How-To: Build a Cloud-Based Solution to Mobile Device Security
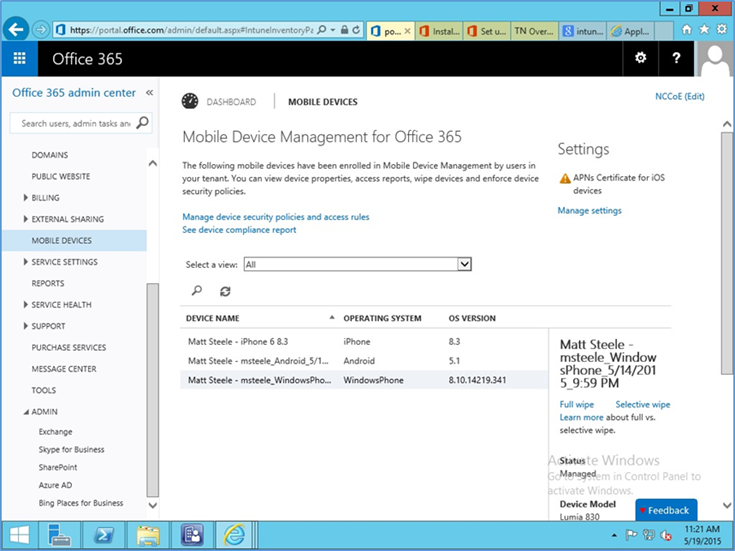
This section of the practice guide contains detailed instructions for creating and configuring the cloud architecture depicted below. No software resources are necessary for this build because it is completely cloud based. The only hardware requirement is that the organization that implements this build uses mobile devices that are compatible with the cloud mobile device management (MDM). This building block chose to use mobile devices running iOS, Android, and Windows Phone — the top three operating systems in terms of market share [1].
This How-To guide details the creation, configuration, and enrollment aspects of each cloud service. Keep in mind, a prerequisite to the cloud is an internet domain name. If the implementer does not already have a domain name, one can be obtained from an accredited registrar [2]. You will need to be able to edit the resource records to prove ownership of the domain.
The implementer will also need access to an Apple developer account to generate a push notification certificate for iOS devices. A push certificate allows the Office 365 instance to send push notifications to enrolled devices. Refer to the Apple website for pricing information and more details regarding certificates [3].
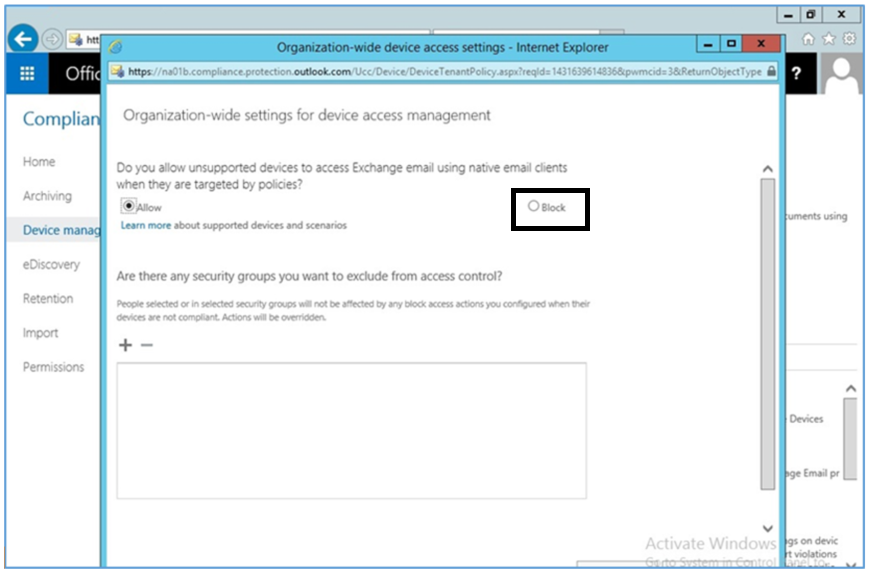
Further, during the configuration of the Office 365 MDM, you will be prompted to allow or block devices from Office 365 that cannot be managed. This can occur when a user has a device with an unsupported operating system. Select Block during this step to enhance the security of Office 365 services.
Finally, we have chosen in this simple cloud build to leverage the MDM capabilities that are available within Office 365. This offers a more limited feature set than what is available through the Intune MDM service. Implementers looking for more capabilities should consider the Intune portion of the Hybrid How-To guide.
2.1. Cloud Build Setup and Configuration
2.1.1. Cloud Build Components
The following components are used for this building block:
Table 2-1 Cloud Build Components
| Make | Model | Version | Quantity |
|---|---|---|---|
| Microsoft | Office 365 Tenant | Business Premium | 1 |
| Nexus (Android) | 6 (5.1) | 1 | |
| Apple | iPhone (iOS) | 6 (8.3) | 1 |
| Nokia | Lumia (Windows Phone) | 830 (8.10.14219.341) | 1 |
| N/A | Public Domain Name | N/A | 1 |
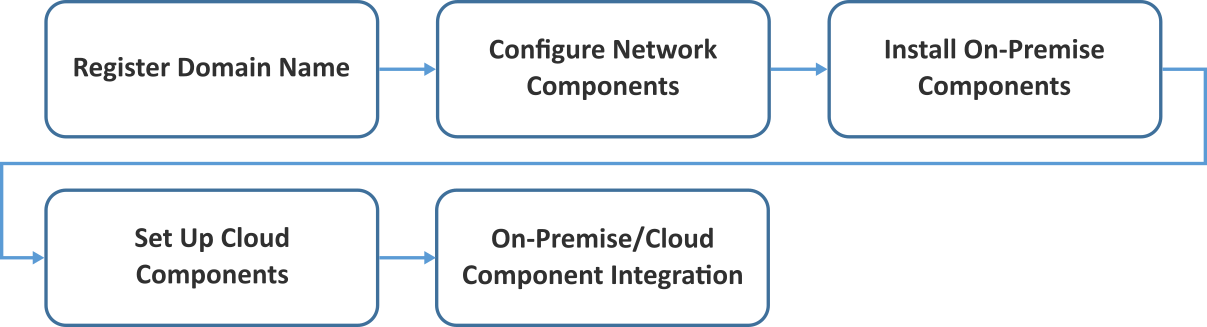
The cloud building block build process can be completed with the following high-level steps in Figure 2-1. The following sections in the How-To guide will focus on the final two steps.
Figure 2-1 Cloud Build Process

2.1.2. Office 365 Setup
Office 365 is the central piece to the functionality of the cloud building block. The only prerequisite to this step is a public domain name. Keep in mind these steps may change as this is a web-based procedure.
To start the process, use a web browser to access the following URL to start the process: https://products.office.com/en-us/business/office-365-enterprise-e3-business-software.
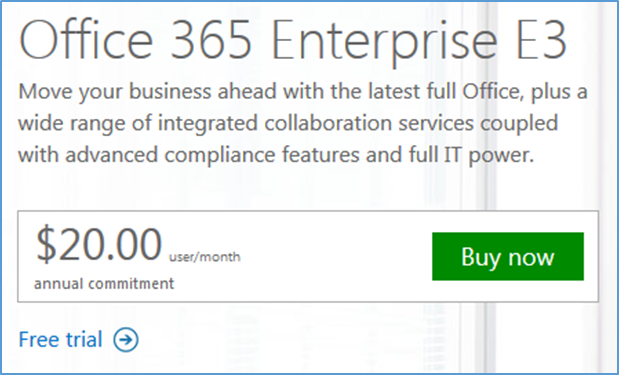
- Choose a commitment level
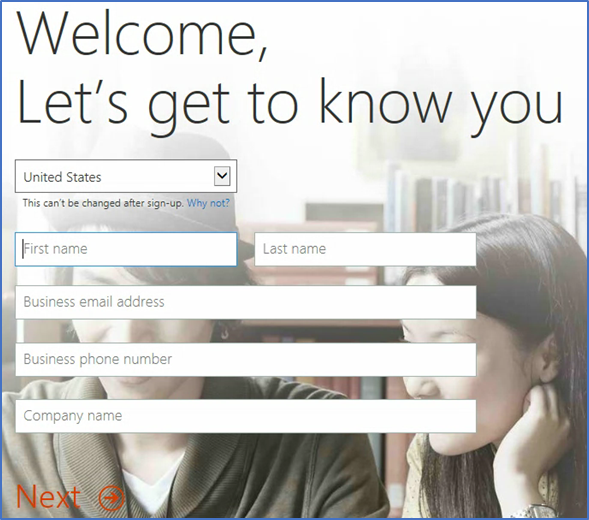
- Fill in the requested information in the next several screens
- Choose Admin from the set of services
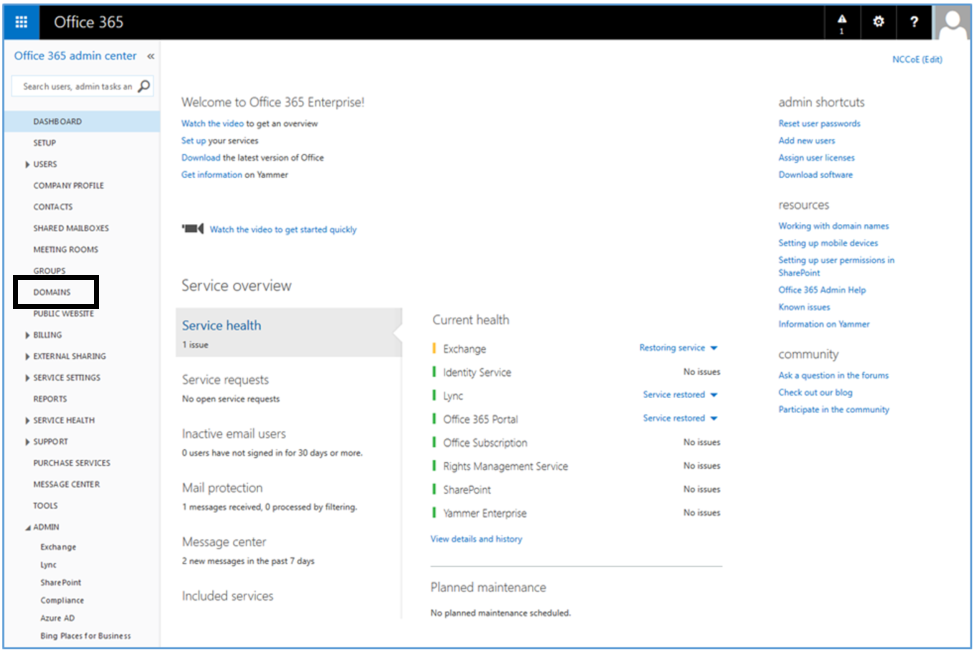
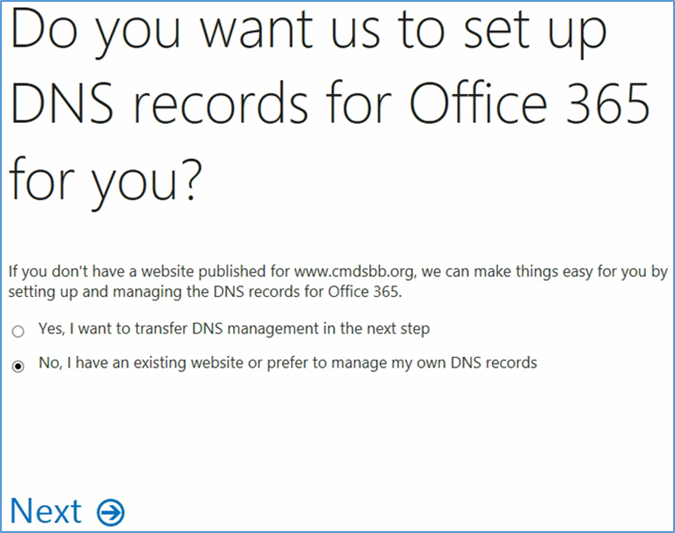
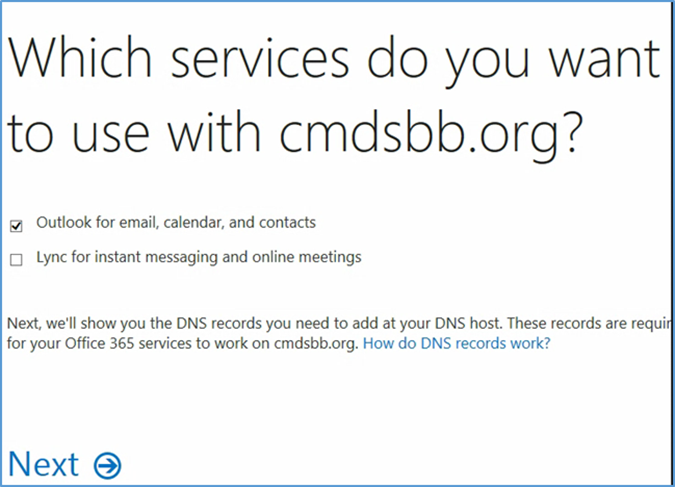
- In the next steps, we will configure the domain name with Office 365. Choose the Domains option
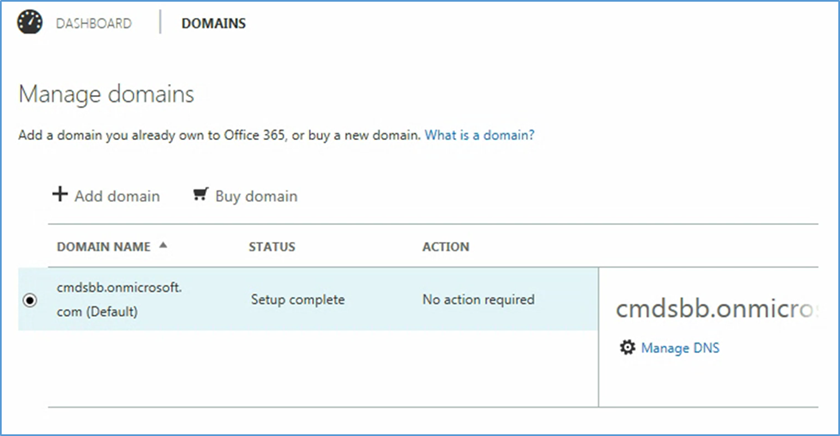
- Choose Add domain
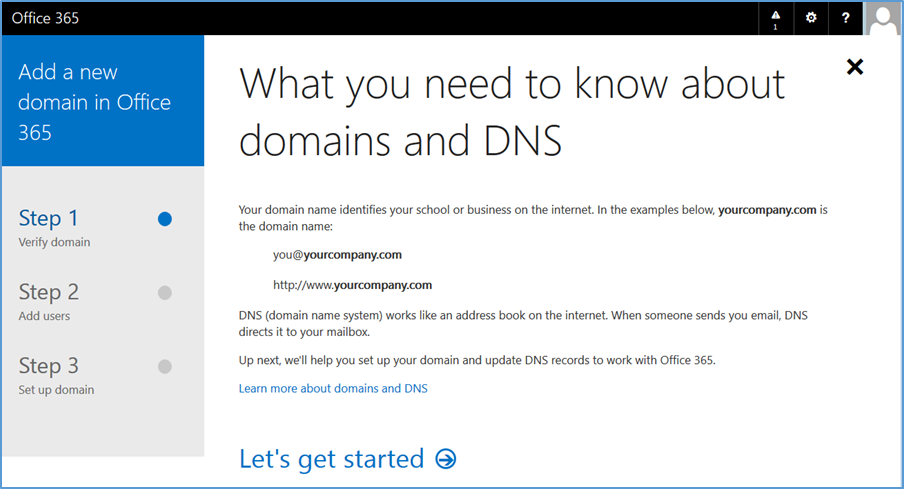
- Choose Let’s get started
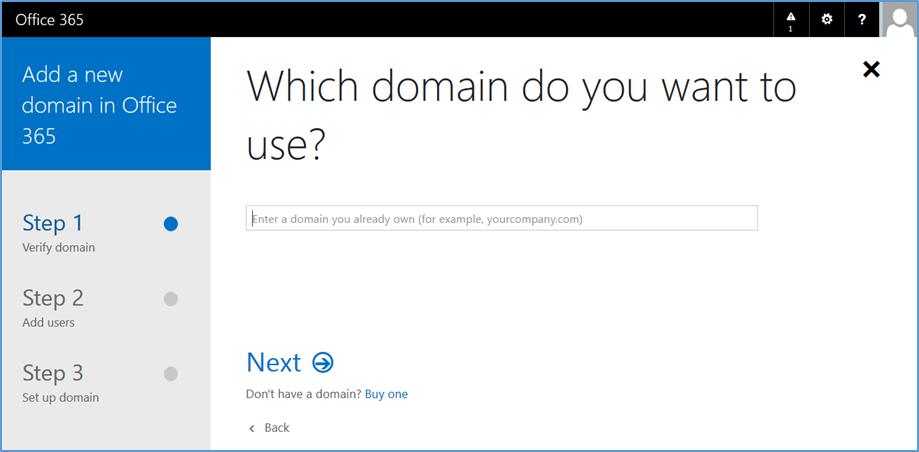
- Enter your public domain name

- Choose Next
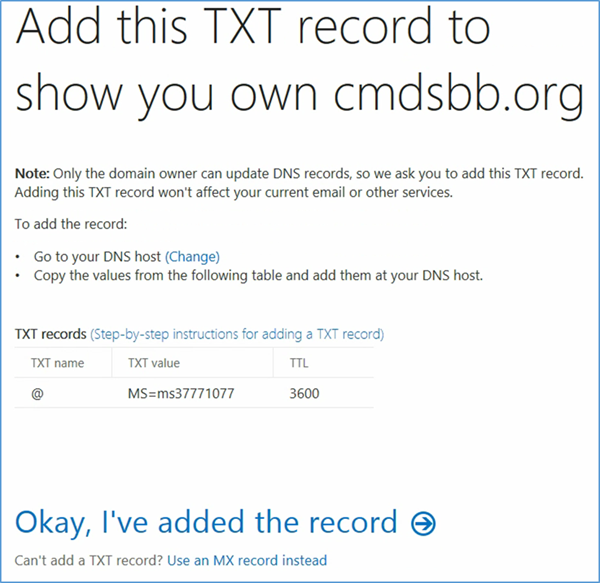
- At this point you need to add this information to the TXT record of your domain name. This functionality should be available from your registrar
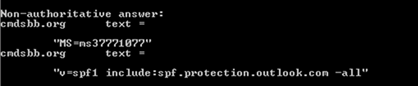
- Verify the Domain Name System (DNS) settings. The TXT record should match what was presented in the previous step. Note that it may take several minutes for the record to propagate to the Office 365 DNS servers
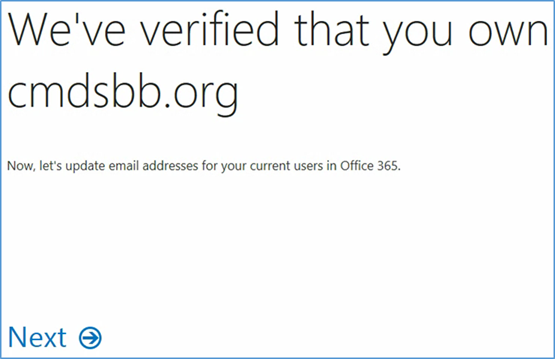
- Choose Next
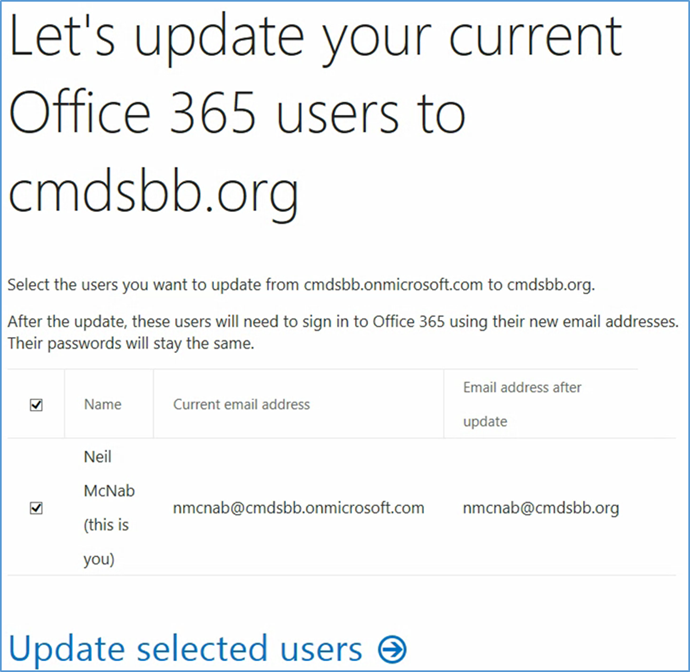
- Choose Update selected users
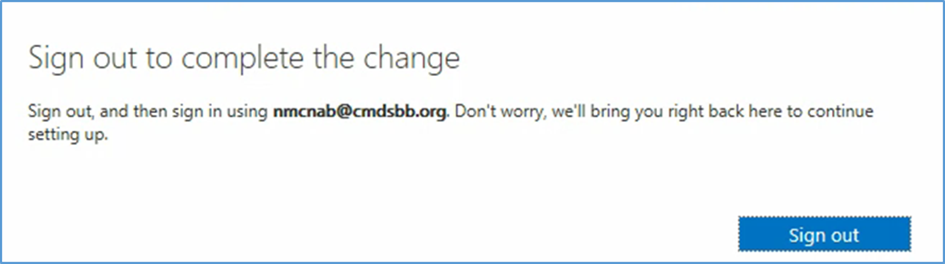
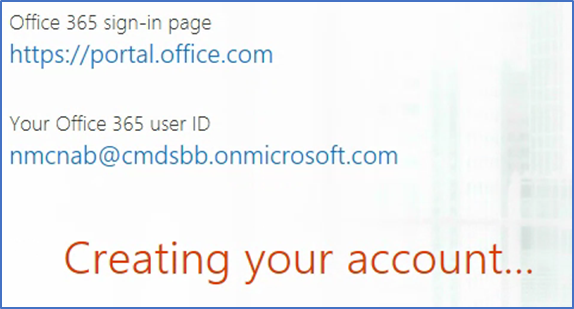
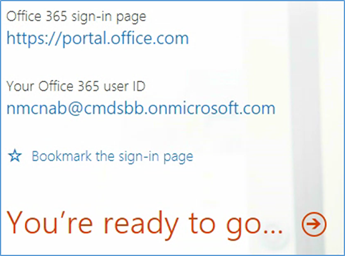
- Sign out to complete the change, and then sign in with your identification.
- Choose Next
- Choose Next
- Choose Next
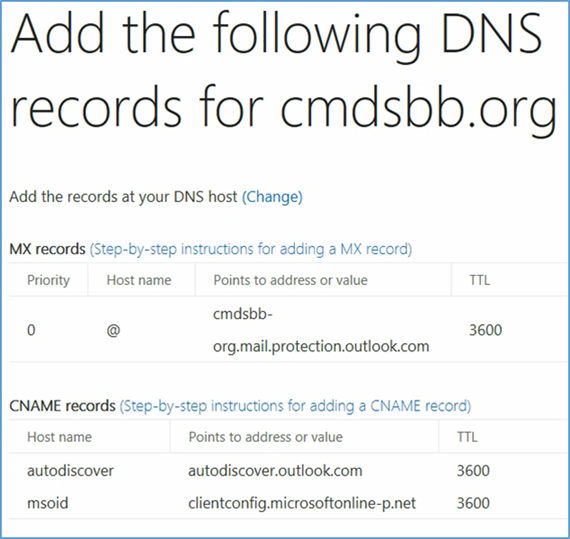
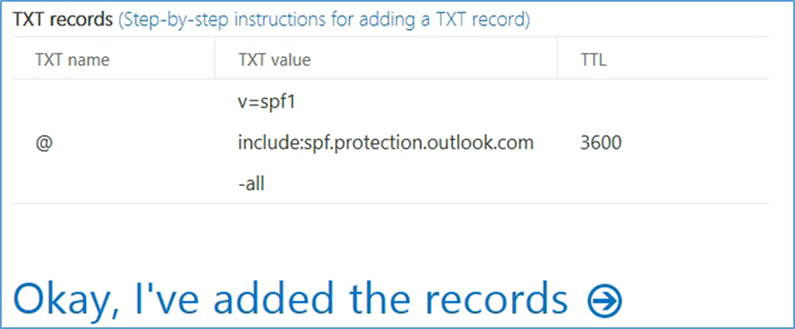
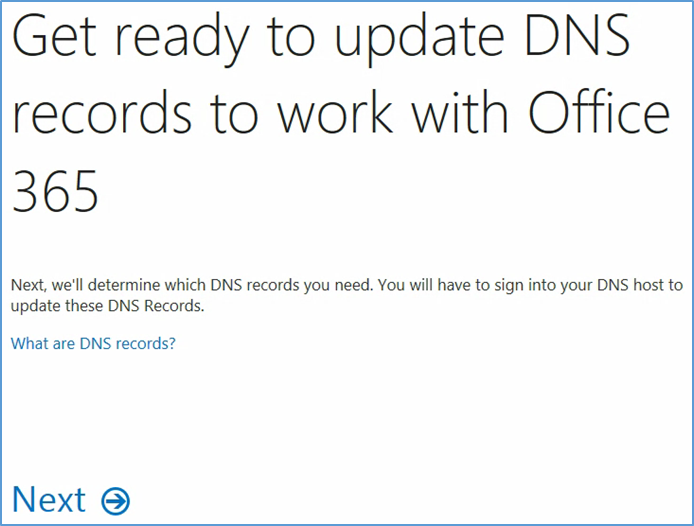
- Add the resource records presented in this step to your domain name. These are necessary for full functionality of the Office 365 tenant
2.1.3. Office 365 MDM Setup
In the next section, you will be guided through the device management setup through Office 365.
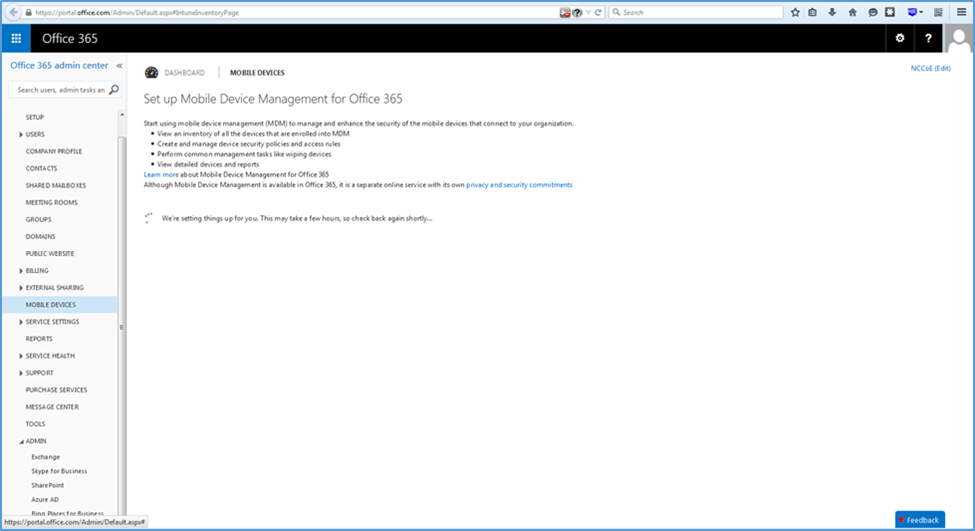
https://portal.office.com/Admin/Default.aspx#IntuneInventoryPage
- Choose Get Started
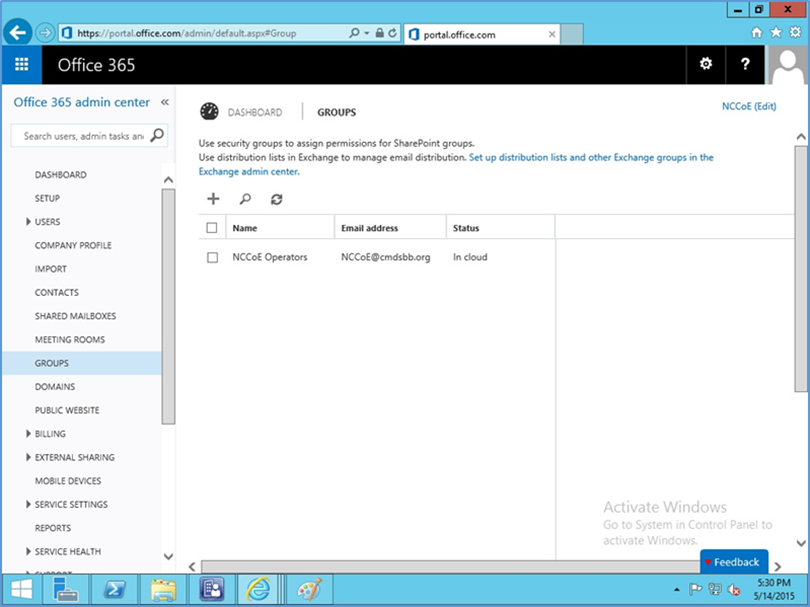
- Next, a security group needs to be created in order to apply the policy to a group of users. Navigate to Office 365 > Admin Center > Groups > +
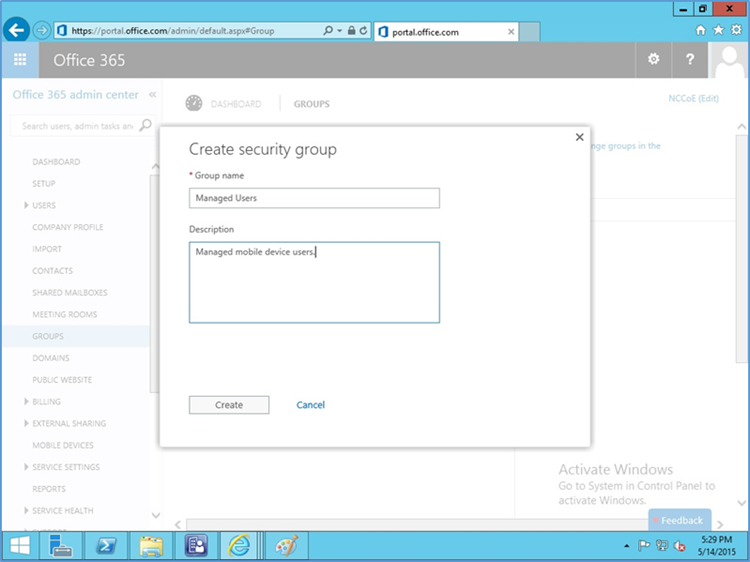
- Add a title and description for the group
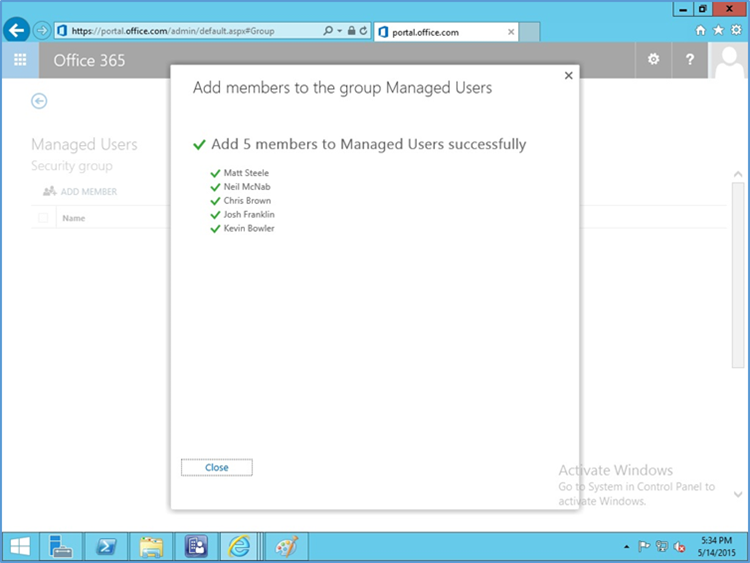
- Add members to the group to be managed
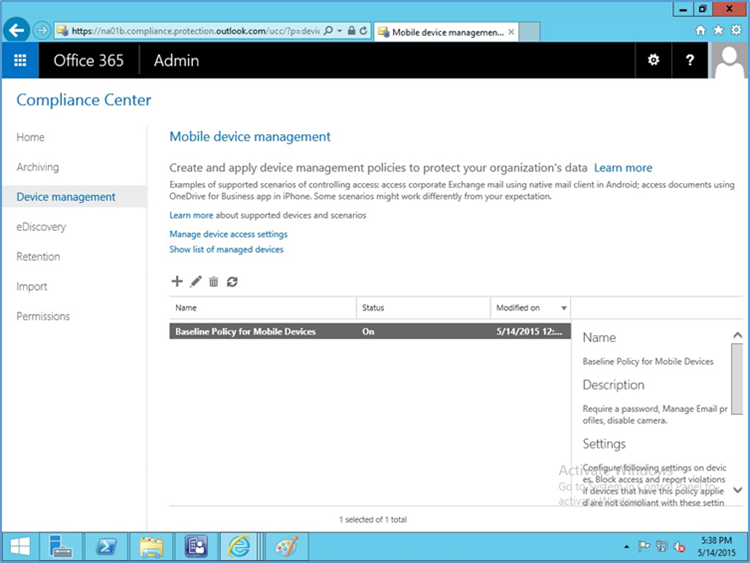
- Go to Office 365 > Admin Center > Mobile Devices > Manage device security policies to configure a device policy to apply to enrolled devices
- Choose to Block unsupported devices
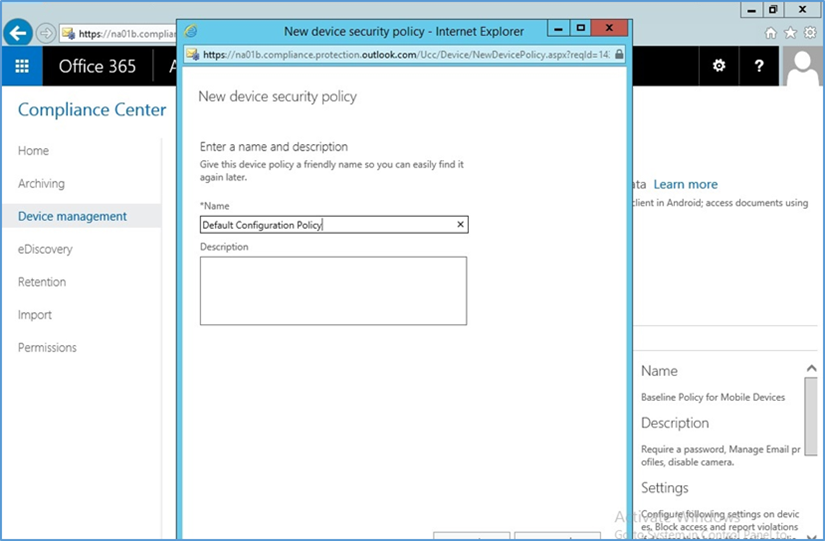
- Set the name for the actual device policy
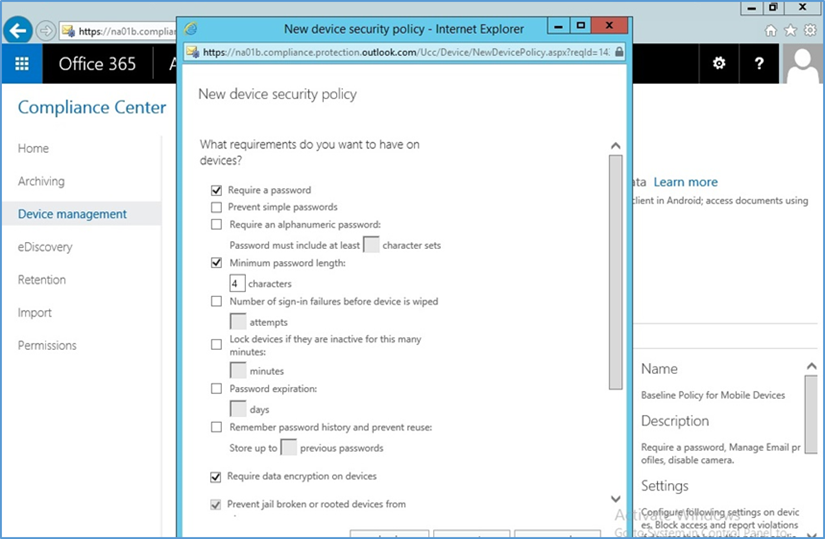
- Set rules for the device policy
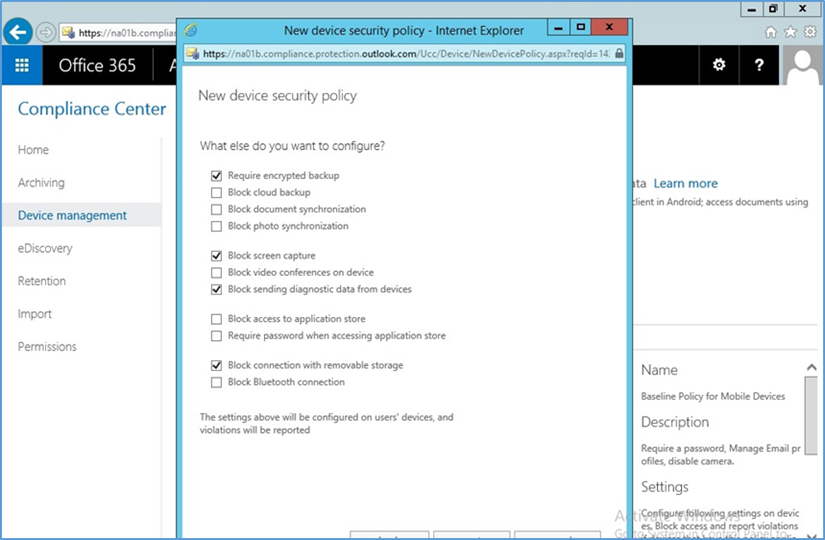
- Set additional restrictions
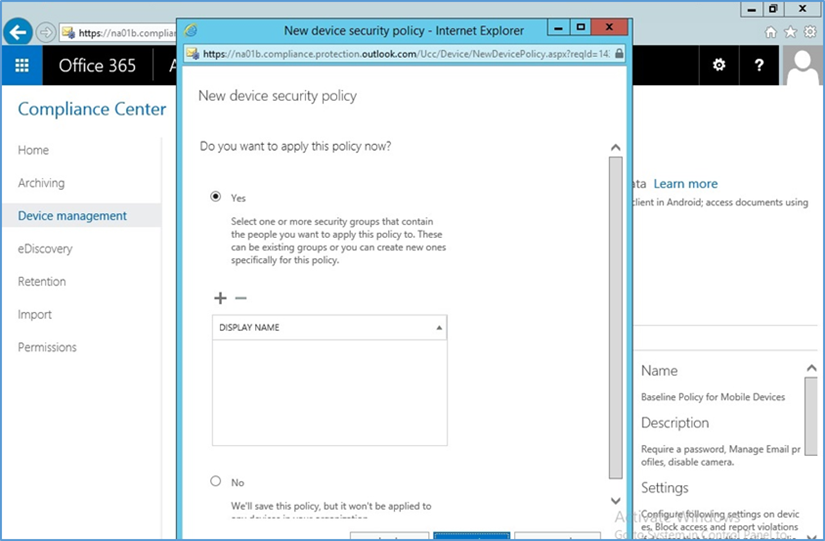
- Select whether to deploy the policy and to what group
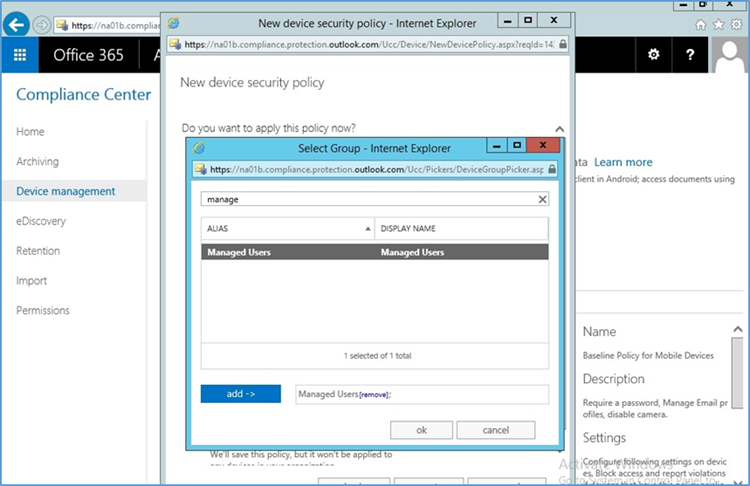
- Select the group created earlier to apply the policy
2.1.3.1. Configure Push Certificate for iOS Devices
As noted in the introduction to this section, an Apple push notification (APN) certificate is required for full functionality with Apple iOS devices. Only Apple can sign these certificates.
- Set up APN in Office 365 > Admin Center > MobileDevices > Manage Settings
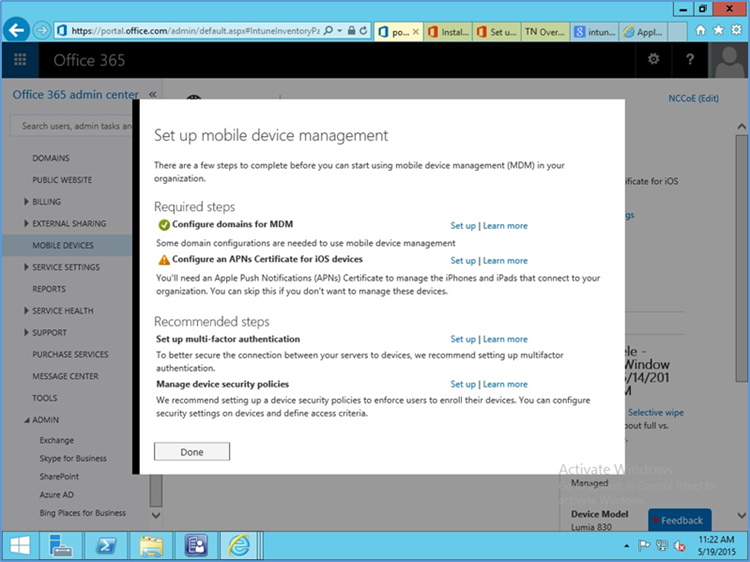
- Configure an APNs Certificate for iOS devices > Set up
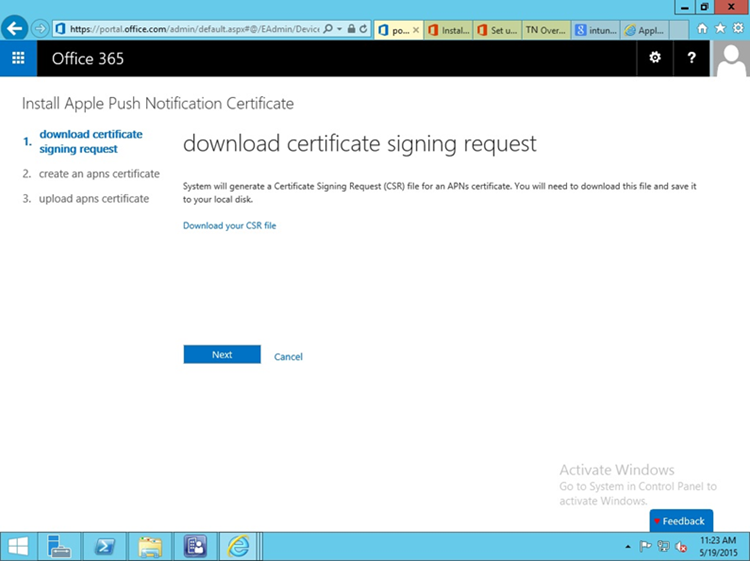
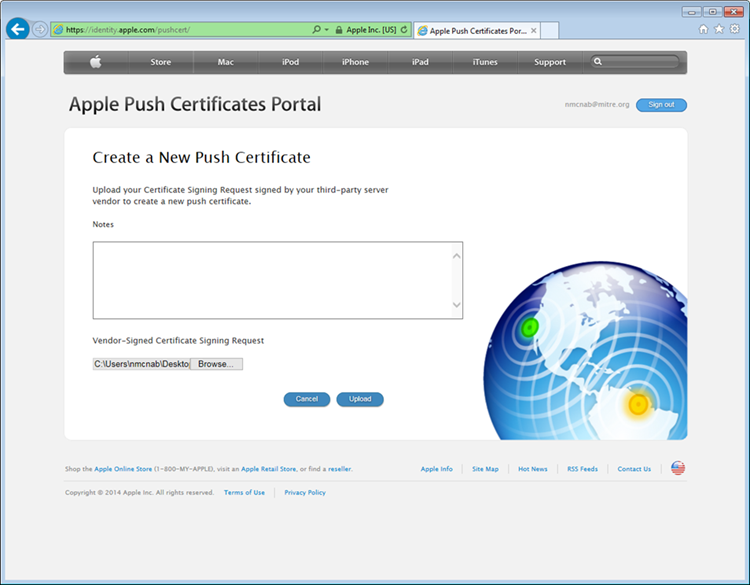
Download certificate signing request (CSR). Once the CSR is generated, it can be submitted to Apple for signing. Use a browser to visit: https://identity.apple.com/pushcert/.
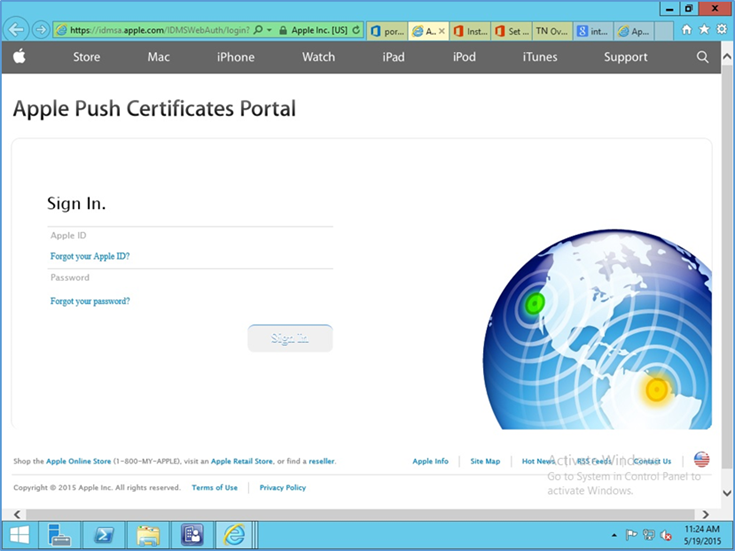
You will be prompted for your Apple Developer account credentials. Sign in
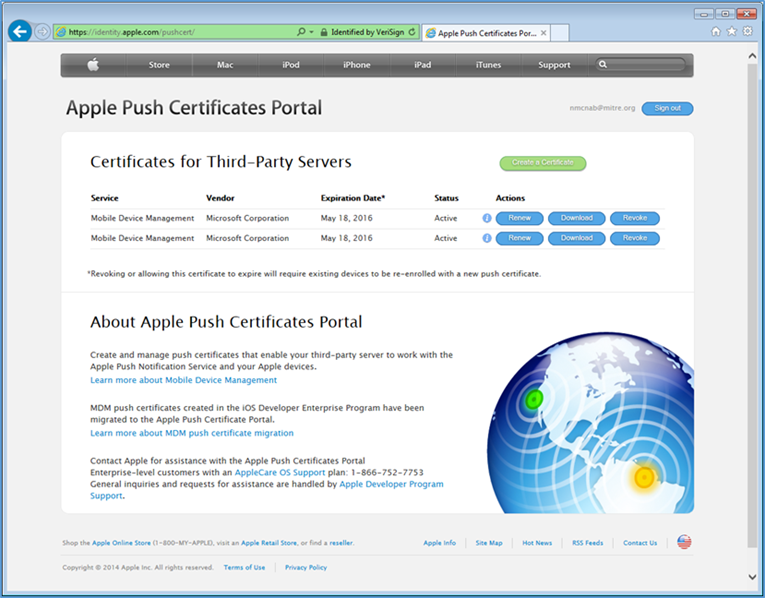
- Once authenticated, choose Create a certificate. Review the terms and conditions screen
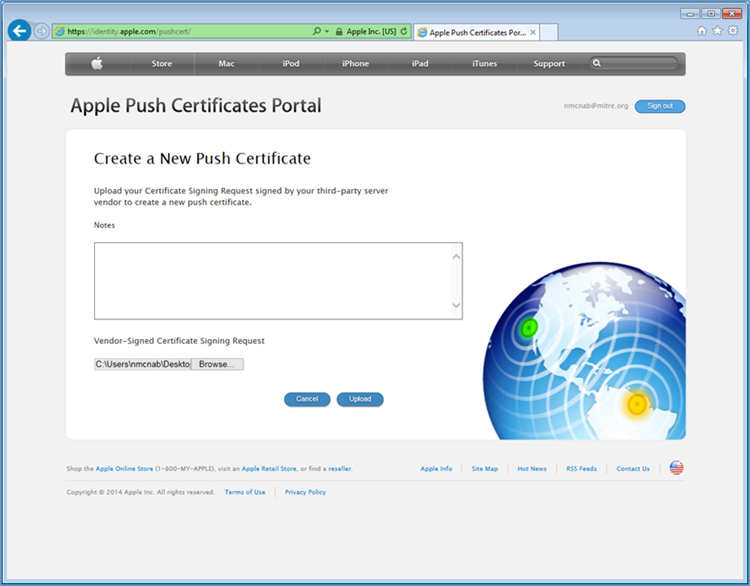
- When creating the certificate, you will be presented with a screen to submit your CSR. Use the Browse button to navigate to where you stored your CSR file and choose Upload
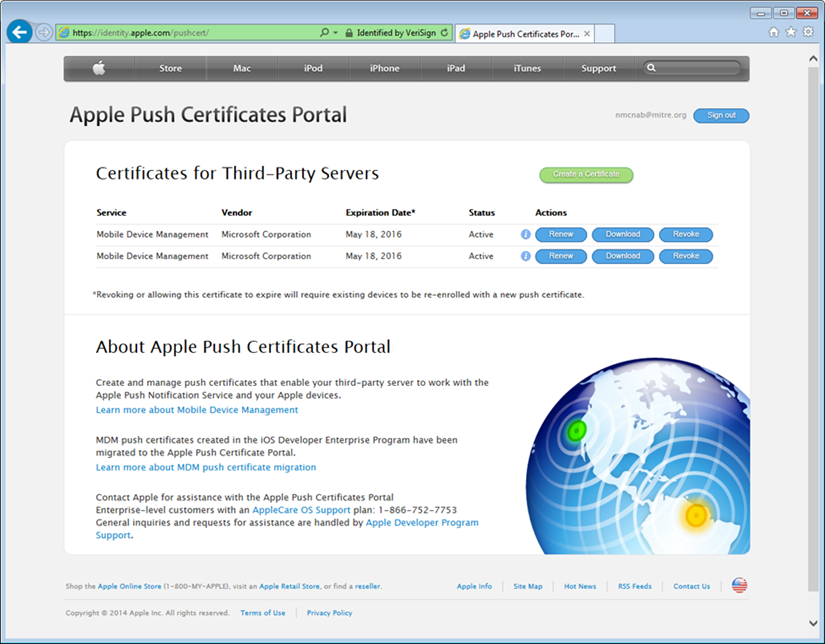
- After the upload, refresh the page. You will be presented with a list of signed certificates. Choose the download option for your new certificate, which will allow you to save the signed certificate in privacy enhanced mail (PEM) format
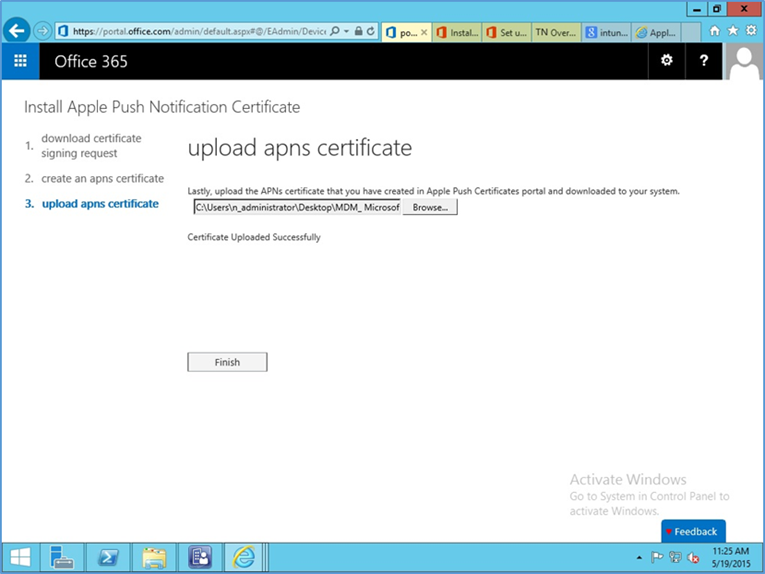
- Return to Office 365, and upload the signed APN certificate from Apple’s developer portal
- Verify that the APN is working correctly. It should have an expiration date listed
3. How-To: Build an On-Premises Solution for Mobile Device Security
3.1. Hybrid Build Setup and Configuration
Figure 3-1 depicts the high-level procedures to reproduce the hybrid build used in this building block. First, the implementer must own an internet domain name or have permission to edit resource records within a domain. This is a prerequisite to integration with the cloud services used within this build. The next set of steps configure the on-premise components. The procedures assume that no on-premise components have been installed, however implementers may wish to skip to the configuration sections if these components are already in place. In general, this guide defers to vendor documentation for installation procedures. The final set of steps instantiate the cloud services and integrate them into the on-premise components.
Figure 3-1 Hybrid Build Process
An important prerequisite to using Active Directory Federation Services (ADFS) in this hybrid arrangement is a third-party public key certificate issued from a reputable certificate authority. In this build we used Symantec’s Secure Site Pro service. You may also want to purchase a third-party certificate to secure the Transport Layer Security channel on the system that hosts the application proxy to avoid web browser warnings/errors when users authenticate to the enterprise. Please refer to TechNet articles [4] and [5] for specific requirements.
Finally, there are several cloud-based services that provide functionality similar to the one chosen in this build. We use Microsoft’s Office 365 for email/calendaring/contacts management and Intune to manage mobile devices. The implementer should note that email/calendaring/contact and MDM from different vendors may not offer the same out-of-the-box integration as what we have chosen here. For example, we have set a compliance rule that forces the mobile device to be enrolled with the MDM before it is given access to email/calendaring/contacts.
3.2. Hybrid Detailed Architecture
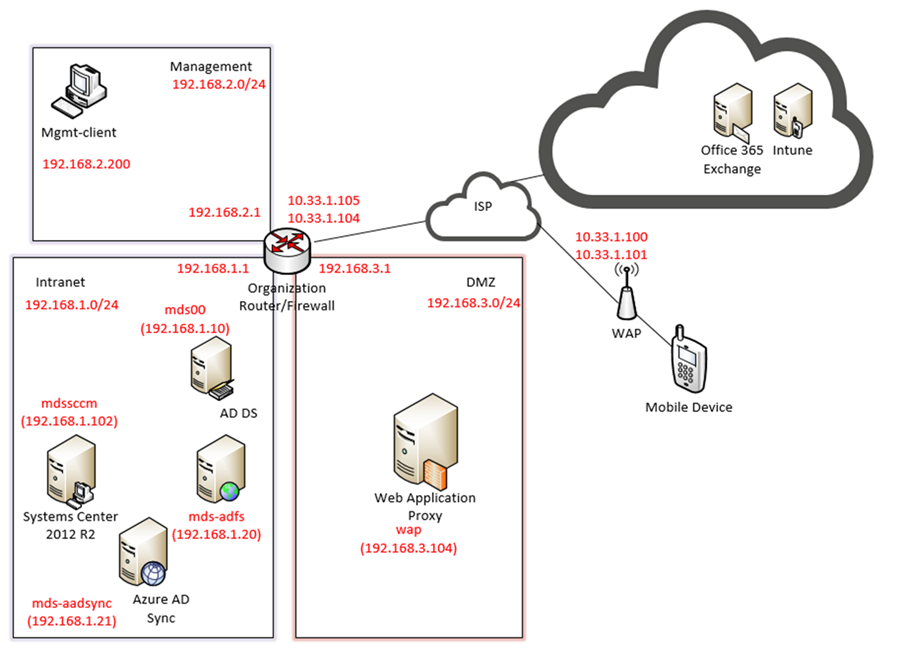
The following architecture diagrams depict the final architecture of the hybrid build after implementing this guide. Figure 3-2 calls out the various protocols implemented among the on-premise, cloud, and mobile device components. Figure 3-3 is a similar view but details the network addressing and host names that were used during the build.
Figure 3-2 Detailed Architecture
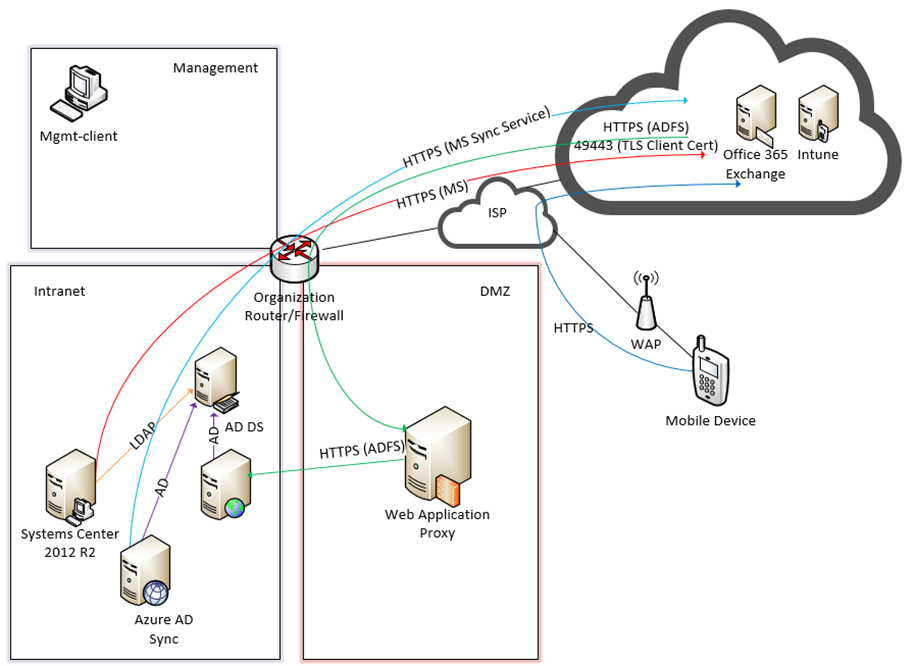
Table 3-1 Legend for Detailed Architecture Diagrams
| Acronym | Term |
|---|---|
| AD | Active Directory |
| ADDS | Active Directory Domain Service |
| ADFS | Active Directory Federation Services |
| DMZ | Demilitarized Zone |
| HTTPS | Hyper Text Transfer Protocol Secure |
| ISP | Internet Service Provider |
| LDAP | Lightweight Directory Access Protocol |
| MGMT | Management Network |
| TLS | Transport Layer Security |
| WAP | Wireless Access Point |
Figure 3-3 Detailed Architecture with Network Addresses and Host Names
3.2.1. Hybrid Build Components
The following components are used for this building block:
Table 3-2 Hybrid Build Components
| Make | Model | Version | Quantity |
|---|---|---|---|
| Lookout Mobile Security | Lookout Security for Work Application | 2.0.150 | 1 |
| Lookout Mobile Security | Mobile Threat Protection | 1 | |
| Microsoft | Office 365 Tenant | Business Premium | 1 |
| Lenovo | Miix (Windows) | 2.8 (8.1) | 1 |
| Nexus (Android) | 6 (5.1) | 1 | |
| Apple | iPhone (iOS) | 6 (8.3) | 1 |
| Nokia | Lumia (Windows Phone) | 830 (8.10.14219.341) | 1 |
| Microsoft | Windows Server | 2012 R2 | 5 |
| Open Source | pfSense | 1 | |
| Microsoft | Windows | 7 | 1 |
| Microsoft | System Center Configuration Manager (SCCM) | 1 | |
| Microsoft | AD DS | 1 | |
| Microsoft | AD FS | 1 | |
| Microsoft | AAD Sync | 1 | |
| Microsoft | Web Application Proxy | 1 | |
| Microsoft | Intune | N/A | 1 |
| Symantec | Public Certificates | N/A | |
| N/A | Public Domain Name | N/A | 1 |
3.2.2. Enterprise Network and Firewall
The build uses pfSense for the organization router/firewall (see figure above). It is a combination router and firewall configured as a virtual device. This subsection describes the configuration used in the build and how to create it.
A single firewall configuration was chosen for simplicity and flexibility in a lab environment, but a dual firewall configuration could also be implemented. Only IPv4 is used and IPv6 is disabled for simplicity.
To install and configure pfSense, implementers should refer to pfSense documentation for installation and configuration instructions. To re-create the build’s configuration, follow the instructions in the documentation and use the configuration files made available by pfSense (pfSense Configuration Files: Interfaces — interfaces-config-pfSense.localdomain-20150402160851.xml; NAT — nat-config-pfSense.localdomain-20150402160838.xml; Firewall — filter-config-pfSense.localdomain-20150402160823.xml)
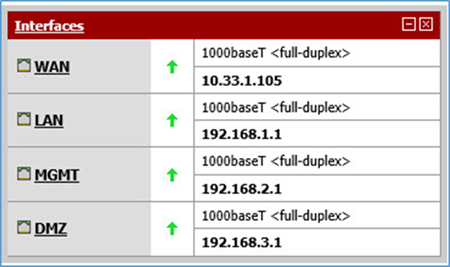
The following screenshots show the final configuration of the pfSense device. Access pfSense through its web interface. The default screen includes a list of interfaces described as part of the architecture in the Hybrid Build Architecture section. The individual interfaces are described below with the firewall rules.
Figure 3-4 List of Configured Interfaces
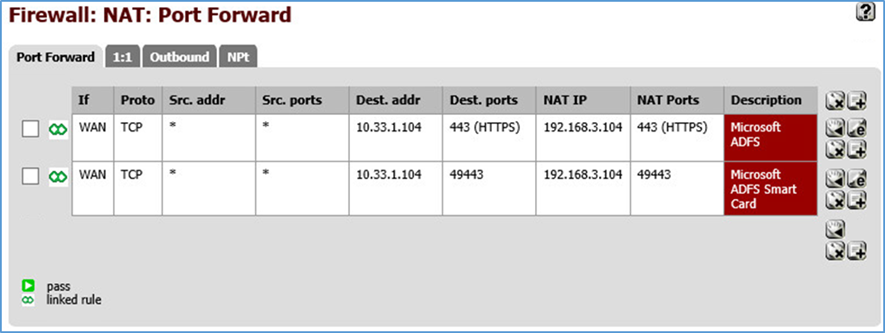
The build network is configured to use network address translation (NAT). The following port forwarding is set up to allow communication from outside the lab into the build network.
Figure 3-5 WAN
Several firewall rules are configured to control access through the subnetworks. The following screenshots show these rules for the wide-area network (WAN), demilitarized zone (DMZ), local area network (LAN), and management network (MGMT).
Figure 3-6 WAN Firewall Rules
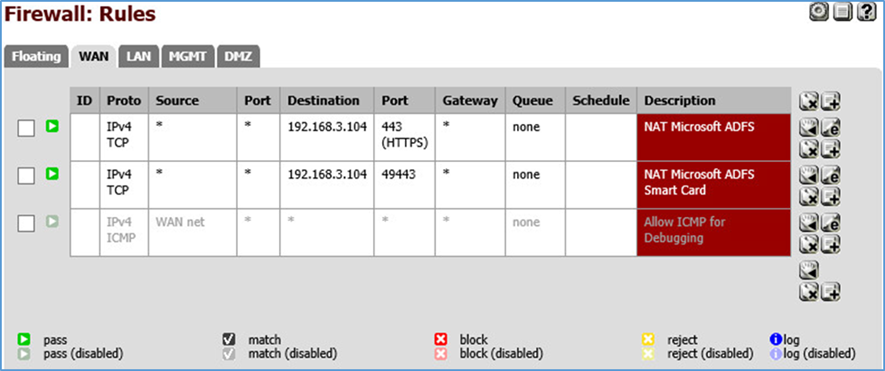
The WAN configuration information is specific to our Internet Service Provider (ISP). In this lab, we provided the 10.33.1.0/24 network from which to statically assign addresses. 10.33.1.105 is the pfSense device’s IP address, and 10.33.1.104 is also assigned as a virtual IP address for the WAP service. Firewall rules are configured to allow internet access to the WAP in the DMZ in order for Microsoft’s ADFS to function.
Figure 3-7 DMZ Firewall Rules
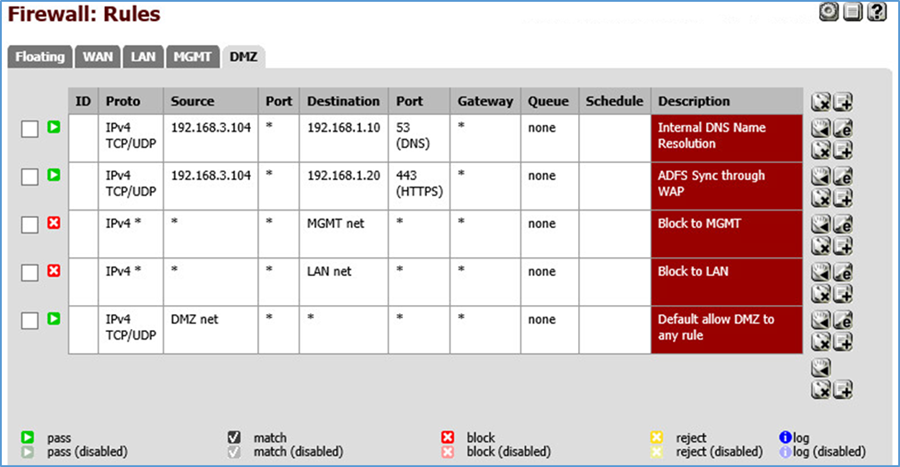
In pfSense our DMZ is assigned as DMZ (OPT2) using the network 192.168.3.0/24. It is not allowed to access the intranet or management networks, except for specific rules for DNS and ADFS access. 192.168.1.10 is the IP address of the Active Directory server. 192.168.1.20 is the IP address of the ADFS server.
Figure 3-8 LAN Firewall Rules
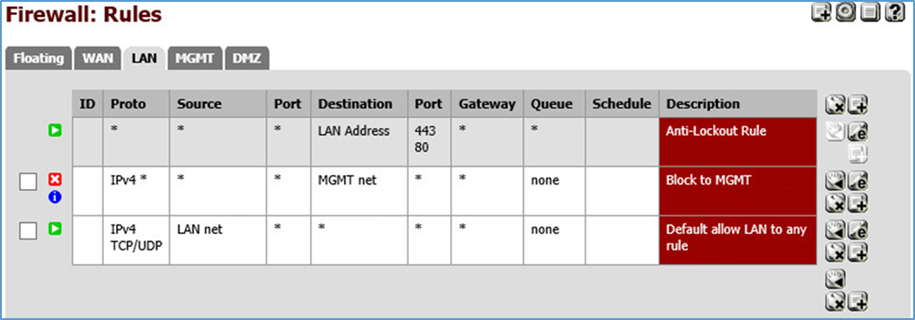
In pfSense our LAN is using the network 192.168.1.0/24. It is not allowed to access the MGMT network.
Figure 3-9 Management Firewall Rules
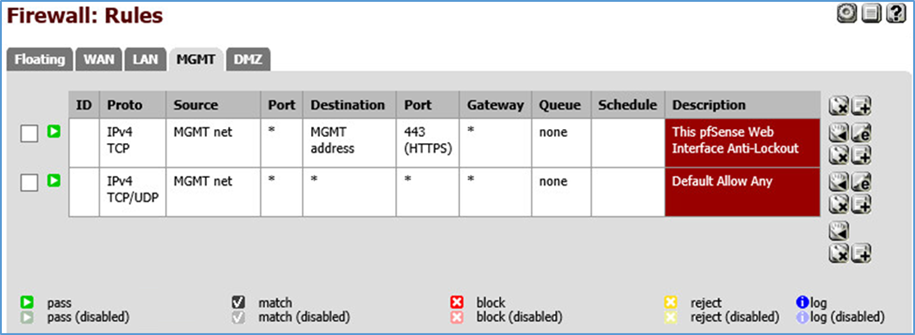
In pfSense our management network is assigned as MGMT (OPT1) using the network 192.168.2.0/24. It has access to all networks.
3.2.3. Enterprise Software Components for Hybrid
The following section describes installation of the on-premise components of the hybrid build. As noted previously, this guide provides references to the vendor’s documentation for installation to better customize the component to the target environment. Alternatively, implementers may replicate this build exactly by using the following table, which maps each component to the exact system used in architecture diagram Figure 3-2, Detailed Architecture.
Table 3-3 On-Premise Components of the Hybrid Build
| Component | Host Name | IP Address |
|---|---|---|
| Active Directory Domain Services | mds00 | 192.168.1.10 |
| Active Directory Federation Services | mds-adfs | 192.168.1.20 |
| Active Directory Federation Services Proxy | wap | 192.168.3.104 |
| Systems Center Configuration Manager | mdssccm | 192.168.1.102 |
| Azure Active Directory Sync Services | mds-adsync | 192.168.1.21 |
In order to increase security from the default server configuration, the Security Configuration Wizard (SCW) included with Windows Server 2012 R2 was used on each server after installation. These policies were saved as XML files and are available for download. They can be viewed, edited, and applied with the SCW tool.
3.2.3.1. Active Directory Domain Services
The Active Directory Domain Services (ADDS) instance used in the hybrid build was created by using basic configuration settings offered through the Add Roles and Features Wizard. The system was deployed as a new forest with a domain name of nccoe.local. Implementers of this guide who seek more details of an ADDS installation can consult an Install Active Directory Domain Services [6] TechNet article. Alternatively, implementers may wish to use a lab environment for their development [7].
After installation, the implementer should create an organizational unit (OU) to hold users who are to be synced with the Office 365 tenant. Create test accounts in this OU of users that will represent individual device owners. Or, as mentioned previously, create users from a production environment.
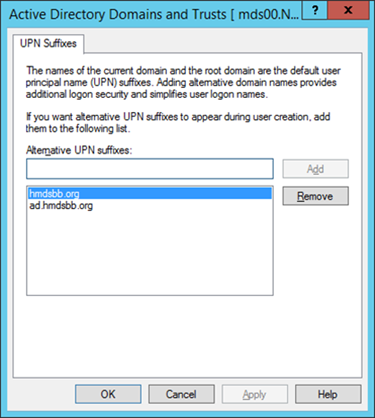
The domain controller will find the user’s account based upon the userPrincipalName in the certificate’s Subject Alternative Name field. The original domain controller was set up with a domain of nccoe.local. However, a more likely scenario would have an organization create an instance under a well-known top-level domain. We have addressed this issue by adding a User Principal Name (UPN) for hmdsbb.org in the ADDS configuration. All users in this configuration are required to have a UPN of <user>@hmdsbb.org. Identity federation between Intune and on-premise ADFS will fail if the users do not have the appropriate UPN.
The procedures to configure a UPN suffix are as follows:
- Launch Active Directory Domain and Trusts snap-in
- Right-click on the top-level Active Directory Domains and Trusts
- Select Properties
- In UPN Suffixes tab add hmdsbb.org and ad.hmdsbb.org domain suffixes
3.2.3.2. Active Directory Federation Service
Readers of this guide should refer to Microsoft documentation for specific installation instructions for their environment. Consult the referenced articles as a starting point for installation [8], [9].
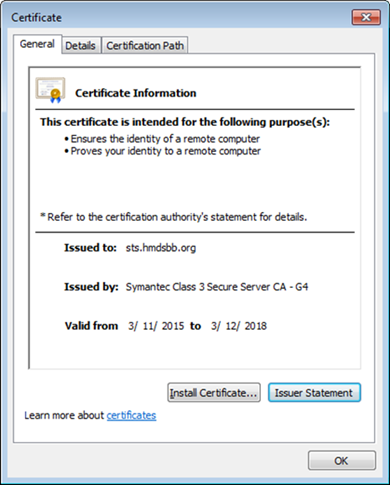
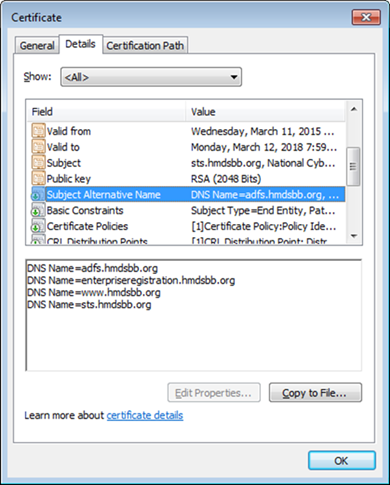
Implementers should note the requirement of a certificate issued from a certificate authority that is recognized/trusted by Microsoft. In this demonstration, the build team procured certificates from Symantec’s Secure Site Pro Secure Sockets Layer (SSL) service. Ensure that the provider is able to populate the Subject Alternative Name extension of the certificates used in the implementation.
Screenshots below are of the certificates from Symantec used in the build.
3.2.3.3. Active Directory Federation Services Proxy
Refer to the articles referenced in the Active Directory Federation Service section for specific installation instructions.
3.2.4. Cloud Services Instances
After the on-premise components have been installed, the cloud services must be created. This section walks the implementer through the basic steps of creating Office 365, Intune, and Lookout accounts.
3.2.4.1. Office 365 Setup
The setup of the Office 365 service is the same as what has been previously described for the cloud build in section 3.1. We replaced cmdsbb.org with hmdsbb.org for this build.
3.2.4.2. Intune Setup
Use a browser to access the following URL to start the Intune creation process: http://www.microsoft.com/en-us/server-cloud/products/microsoft-intune/
- Choose Try Now
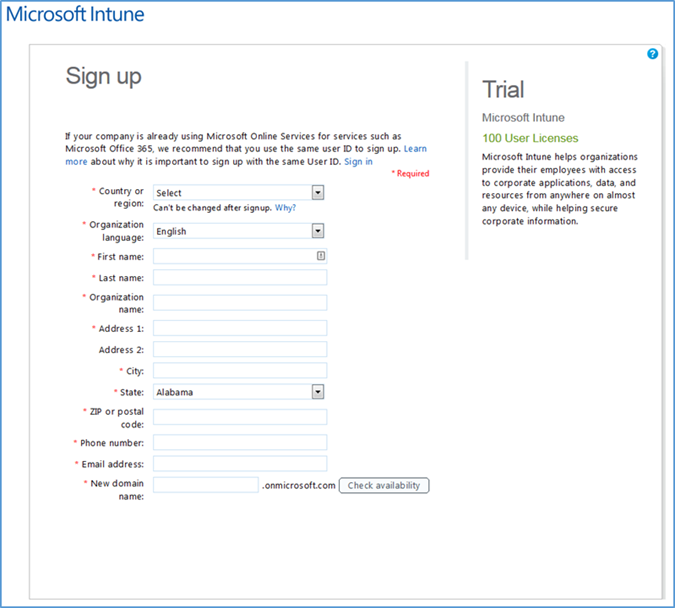
- Sign up for a trial license when prompted
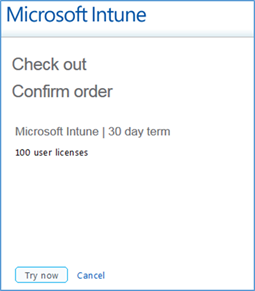
- Choose Try Now
Sign-up is complete, and you should be redirected to the Intune management console at https://manage.microsoft.com.
Note that the Silverlight 3.0 browser support is required to load the management console.
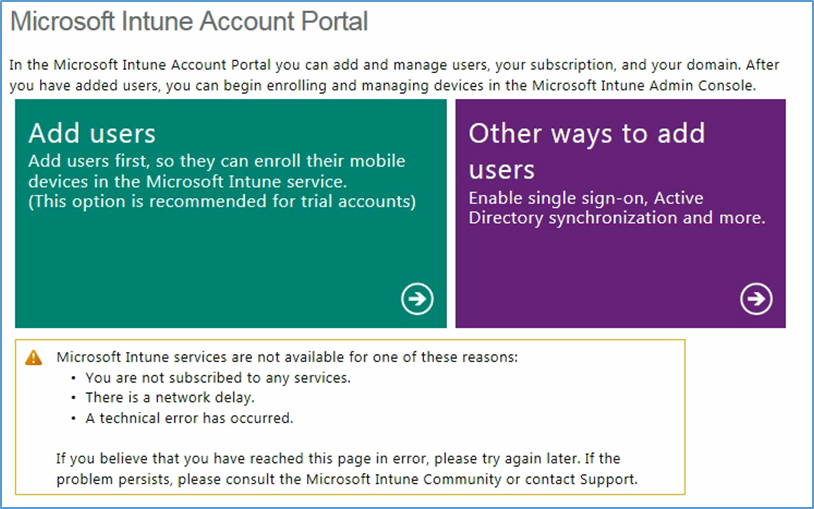
Important! Do not proceed any further with Intune if you want to manage devices via SCCM.
3.2.4.3. Lookout Setup
Contact the enterprise sales team at support@lookout.com to create an account.
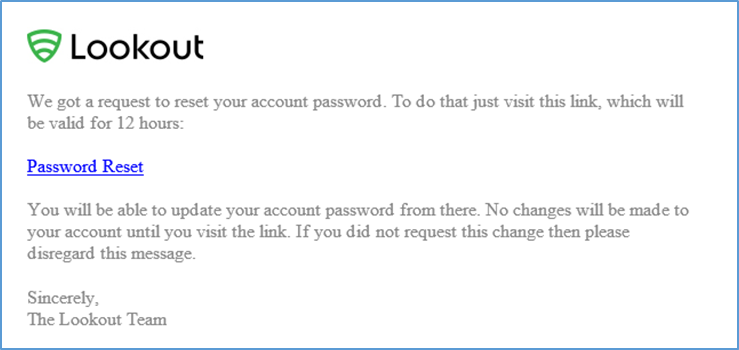
- After your account has been created, the designated administrators will receive an email instructing them to reset their password. Click the link and reset the password
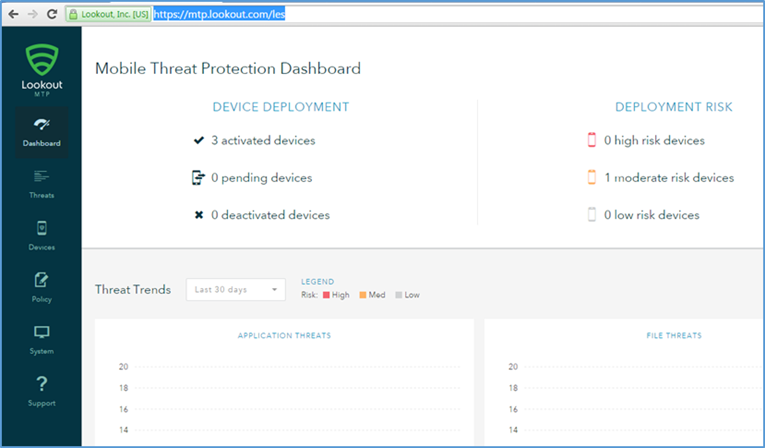
- Open the Lookout administrative console to access the Lookout administrator functions by using a browser and navigating to https://mtp.lookout.com/les
3.2.5. Hybrid Integration
This section documents the integration of cloud and on-premise services.
3.2.5.1. Office 365 with Active Directory Federation Setup
In this step, an on-premise ADFS server is integrated with the Office 365 service. The purpose of this integration is to provide identity federation between Office 365 and enterprise authentication service. You should have previously added your public domain to Office 365 in the Office 365 Setup section. If not, follow the procedures from TechNet Magazine [12]. Detailed integration information can be found in the referenced TechNet article [9].
Connect ADFS with your Office 365 instance by issuing the following two commands. This step will automatically exchange the required metadata to implement federation with Office 365
Set-MsolAdfscontext -Computer <AD FS server FQDN>Convert-MsolDomainToFederated -DomainName <domain name>
3.2.5.2. Azure Active Directory Sync Services
For this step, we configure synchronization of the organization’s enterprise Active Directory with the Office 365 directory. This service will periodically sync identities — adding, deleting, or otherwise modifying from the on-premise Active Directory to the Azure Active Directory instance when this step is completed. This build accepted the default syncing schedule, but it may be tuned at a later time.
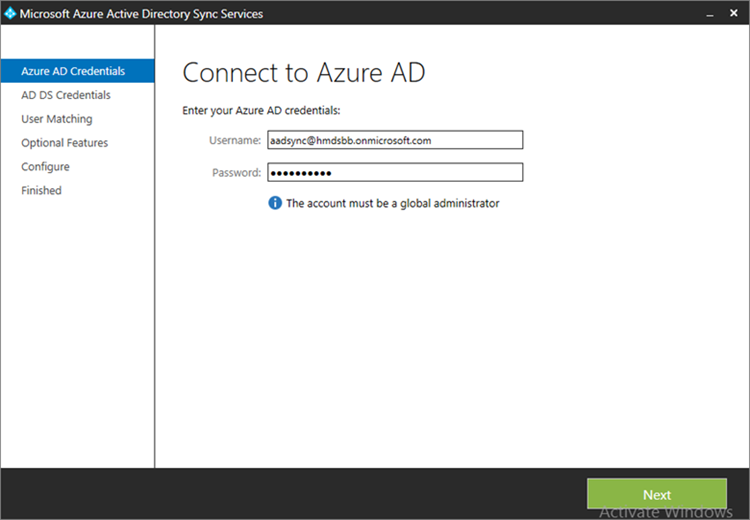
- Launch the Sync Services Configuration Tool. Input the global administrator credentials for the Office 365 instance and click Next
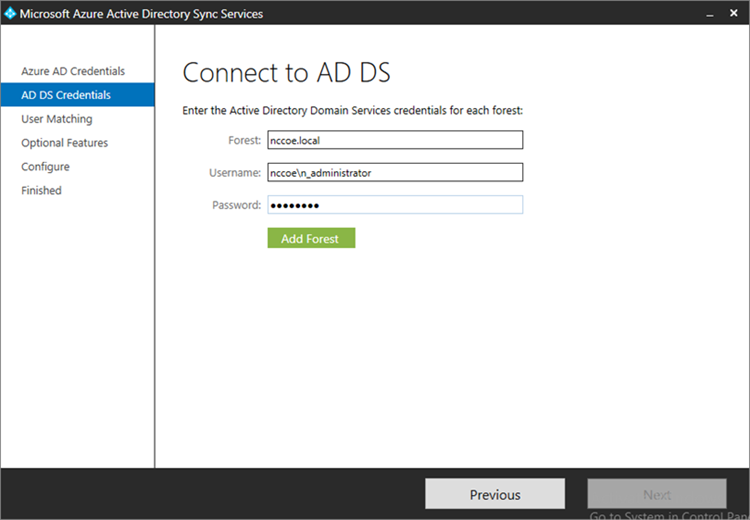
- Input the Forest name and credentials of the administrator. Click Add Forest
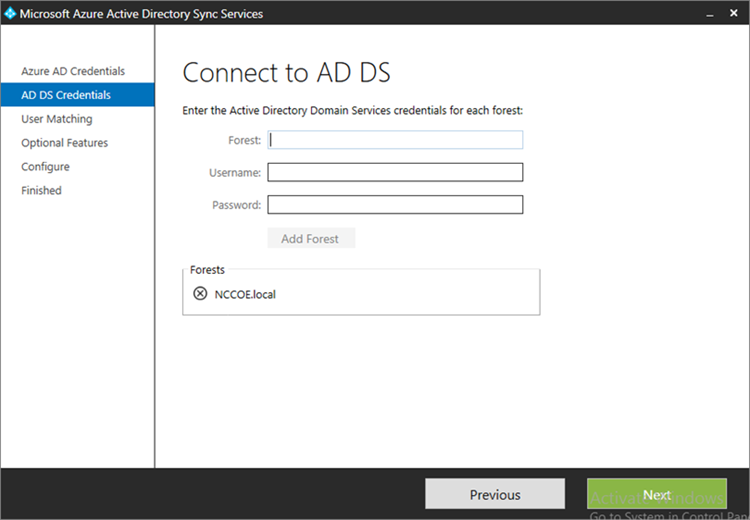
- Click Next
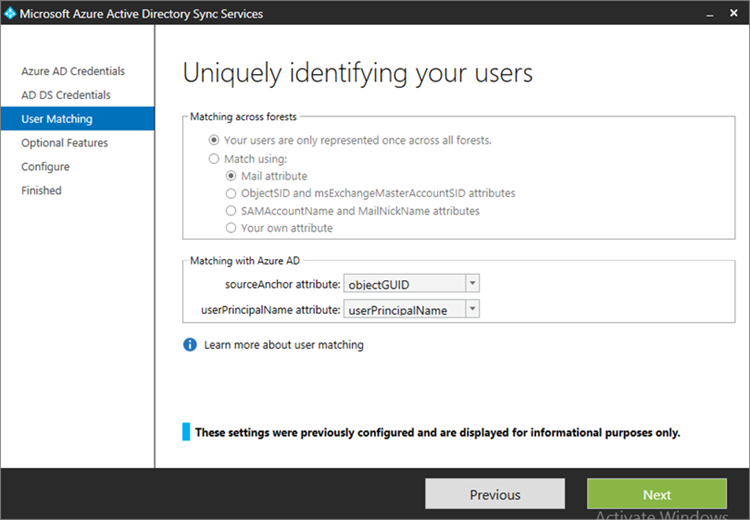
- Accept the defaults for uniquely identifying your users. Click Next
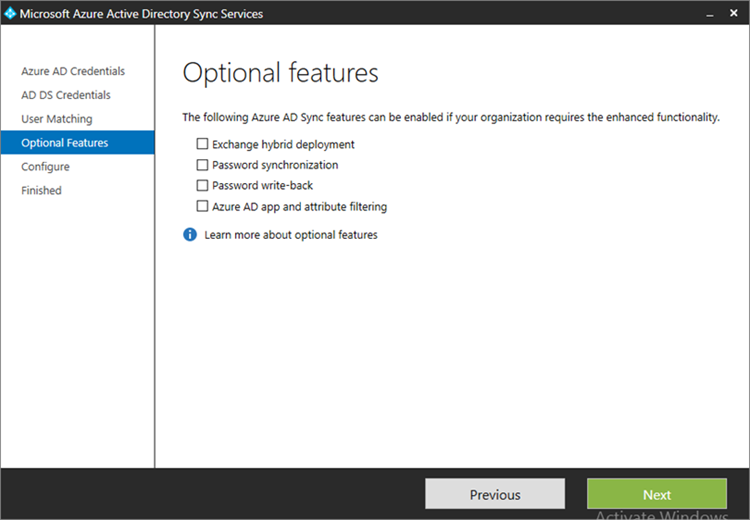
- Do not choose any of the optional features. Click Next

- Click Configure
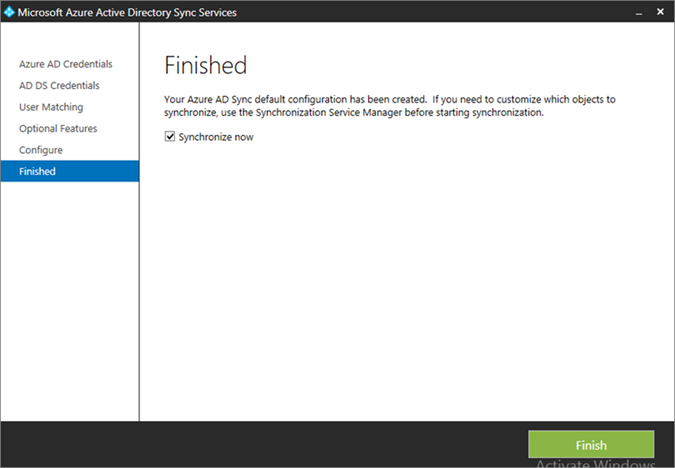
- Choose to Synchronize now and click Finish
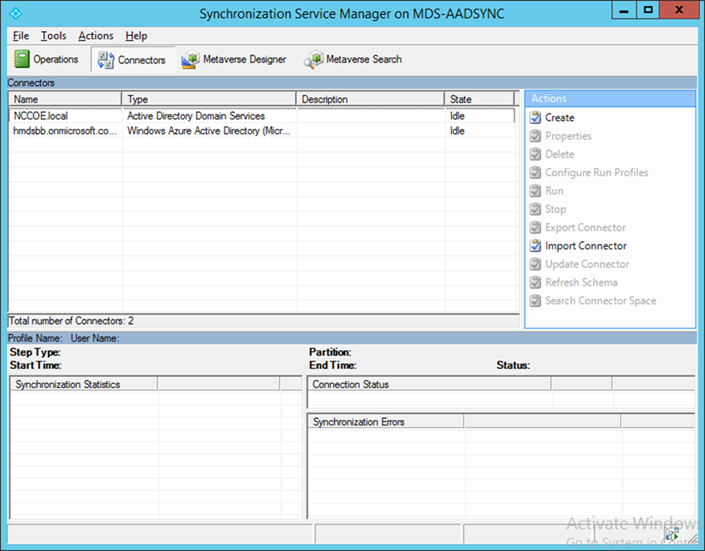
- If successful, the added connectors will be displayed in the Synchronization Service Manager
3.2.5.3. Sync Intune with Office 365 Exchange
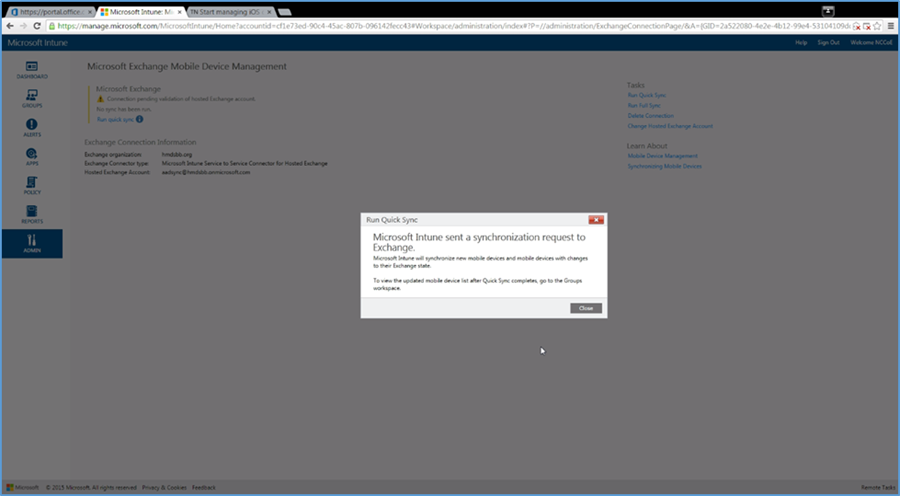
The following steps will establish a back-end connection between the Intune and Office 365 instances, which were created in the Cloud Services Instances section. When this step is completed, Intune will have the ability to enforce conditional access policies on all enrolled mobile devices.
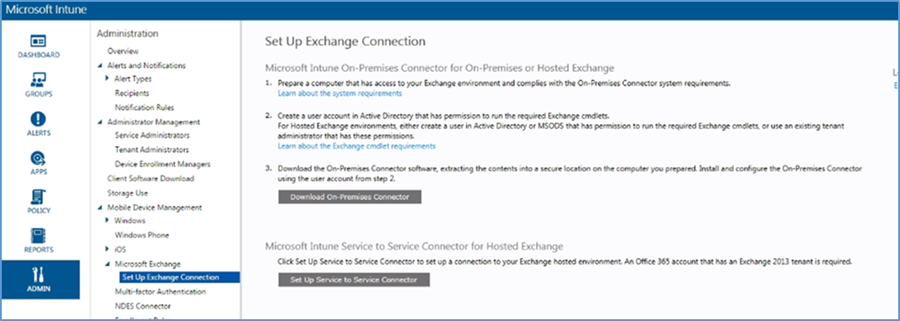
- Open the Intune administrative console with a browser. Click ADMIN
- Click Set Up Exchange Connection within the Microsoft Exchange section
- Click Set Up Service to Service Connector
The configuration with Office 365 will occur in the background. No further actions are required.
3.2.5.4. Manage Intune with SCCM
To allow the Intune tenant to be administered remotely, SCCM must be configured on the enterprise network. The following steps add test accounts to an SCCM user collection and syncs with the Intune tenant. While Intune will be available through the browser-based administrative console after this exercise, the account will be permanently configured to manage devices through SCCM.
3.2.5.4.1. Configure Active Directory User Discovery
When these steps have been completed, the SCCM instance will be able to automatically discover Intune users by way of an Active Directory container.
- Launch the Configuration Manager console. Navigate to System Center Configuration Manager /Site Database/Site Management/<site name>/Site Settings/Discovery Methods
- Right-click Active Directory User Discovery, and then click Properties
- On the General tab, click the New icon to specify a new Active Directory container
- On the New Active Directory Container dialogue box, specify Local Domain
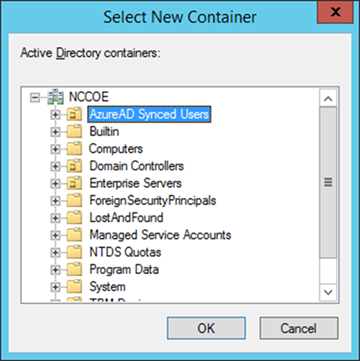
- Select the AzureAD Synced Users container
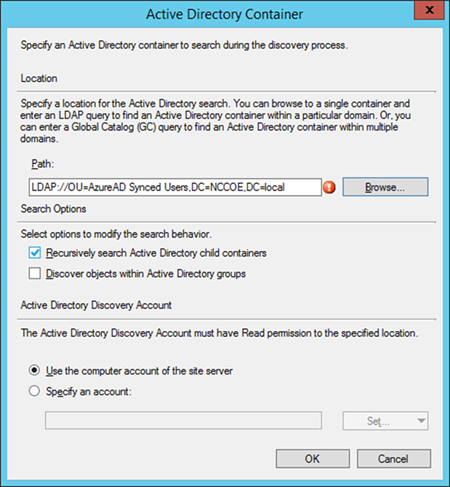
- The path will reflect the container chosen in the previous step. Click OK
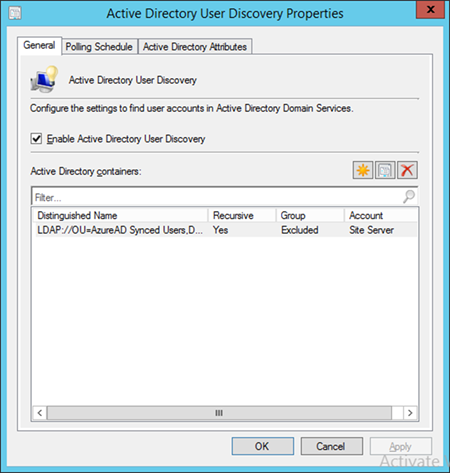
- Ensure Enable Active Directory User Discovery is selected. Click OK
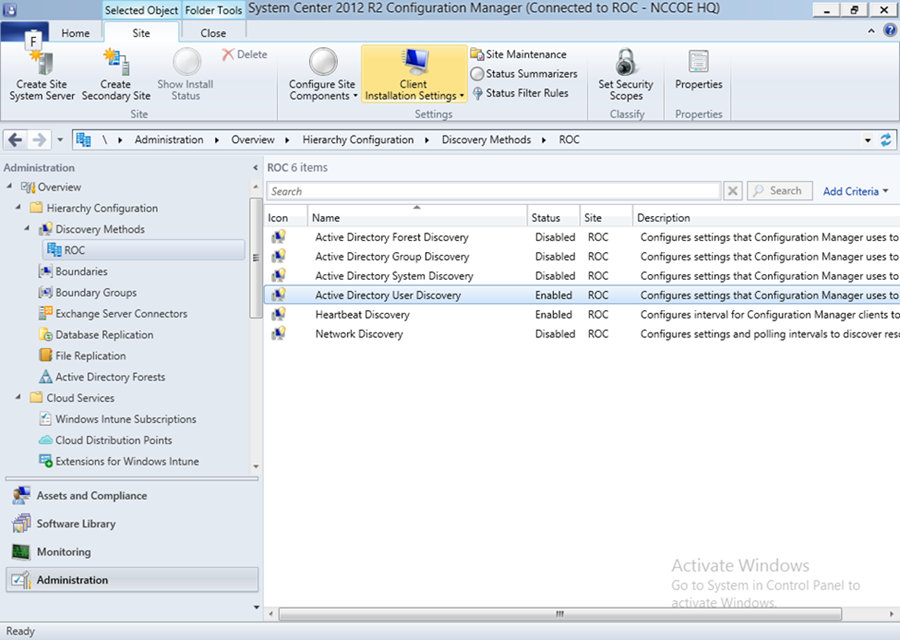
- After configuration, the status of the Active Directory User Discovery will be Enabled
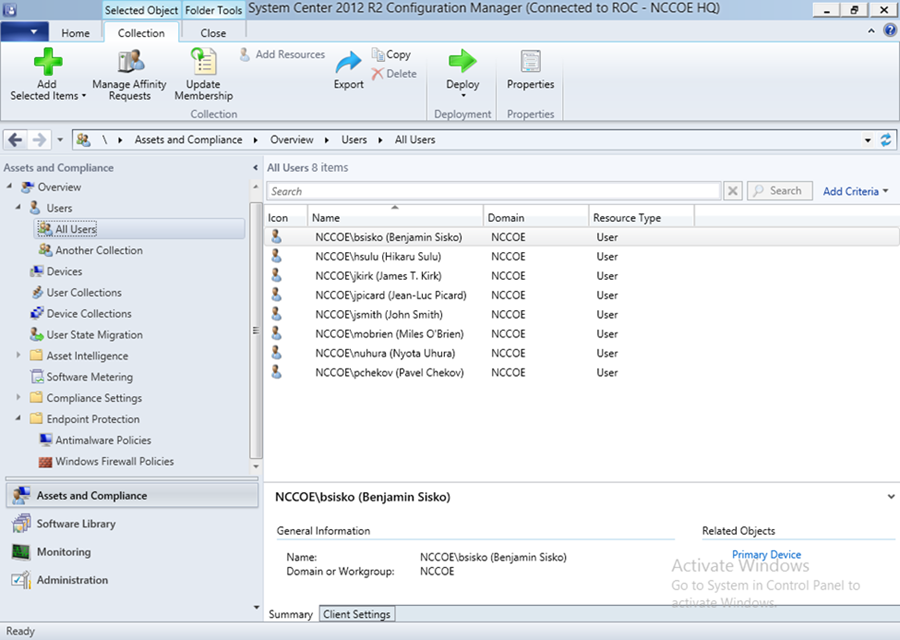
- Navigate to Users > All Users to view accounts synced from Active Directory
3.2.5.4.2. Register SCCM with Intune
The following sequence of steps enrolls an SCCM instance with the Intune tenant. After this step you will no longer be able to create and deploy policies from the Intune web management portal.
- Start the Intune Subscription wizard by opening the Configuration Manager. In the Administration section, expand Cloud Services, and click Microsoft Intune Subscriptions. Click on the Home tab and then Add Microsoft Intune Subscription
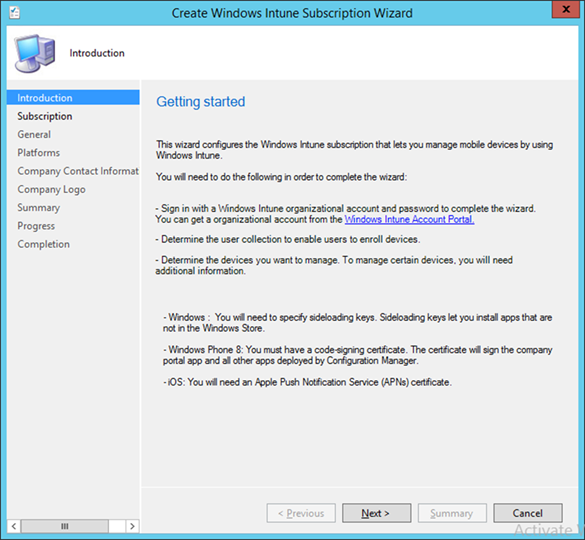
- Click Next
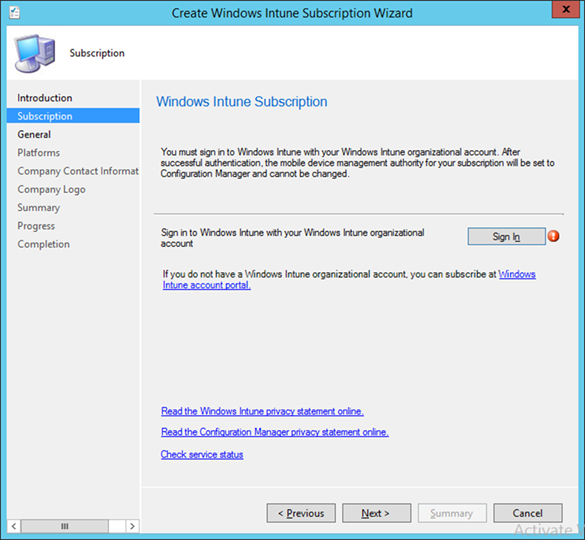
- Click the Sign In button
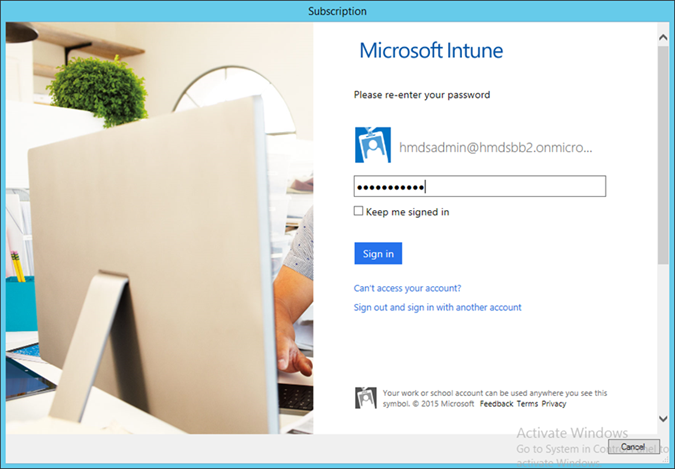
- Sign in using an administrative user from the Intune tenant
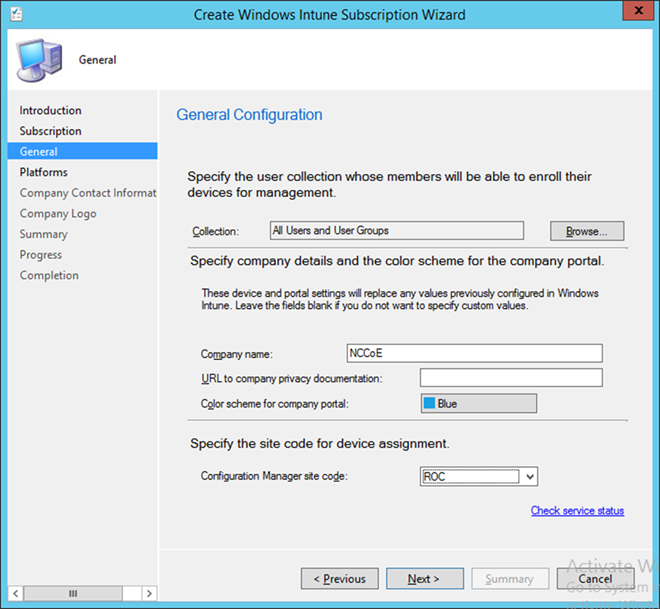
- Authorize a collection of users to enroll with Intune. Click Next
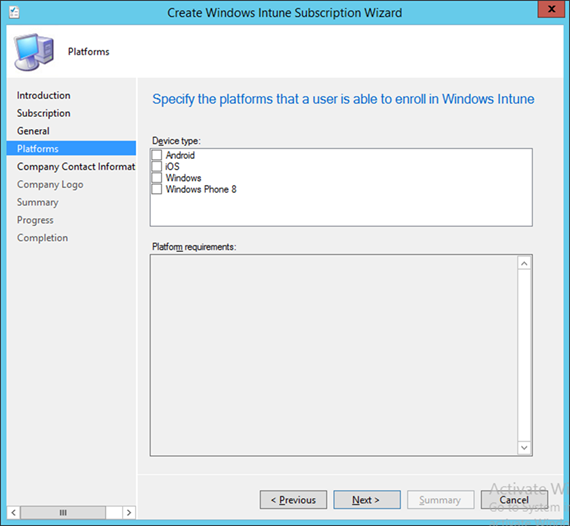
- You may choose to configure device types in this step. However, we chose to configure these in a later step. Click Next
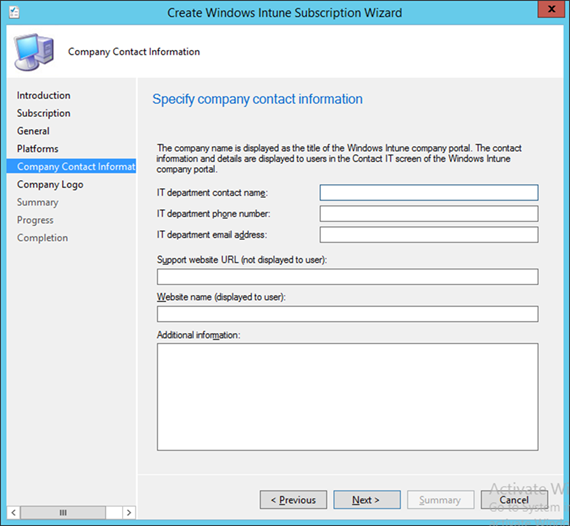
- Enter the contact information for your organization. This is optional. Click Next
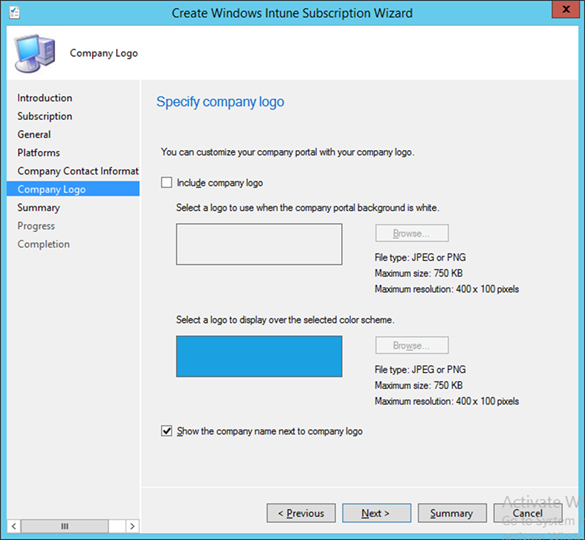
- Submit an organizational logo, if desired. Click Next
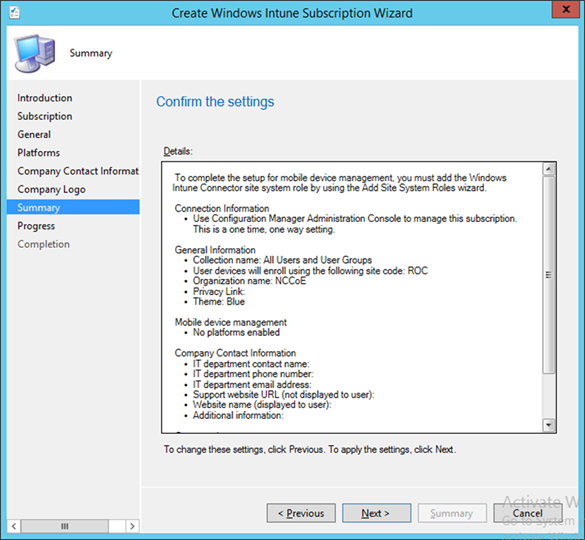
- Review the settings and click Next
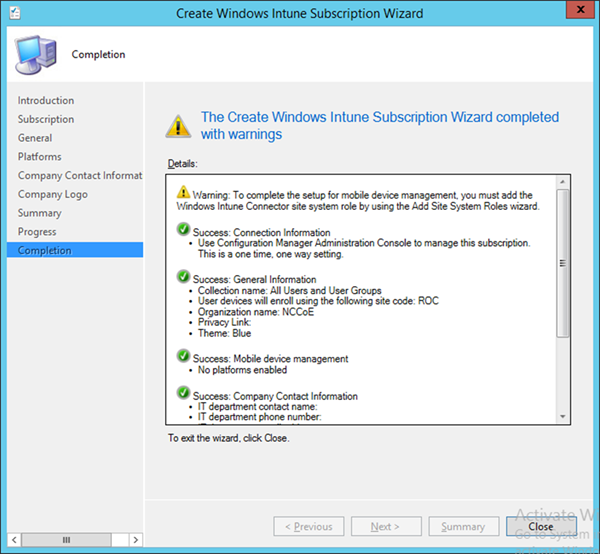
- Close the wizard after the configuration completes. A green check mark indicates success for that task
- The Intune administrative console reflects SCCM management after configuration has been completed
3.2.5.4.3. Configure Push Certificate for iOS Devices
A push notification certificate is required for full functionality with Apple iOS devices. Only Apple can sign these certificates. Once the CSR is generated, it can be submitted to Apple for signing. The following procedure shows how to create the CSR within SCCM.
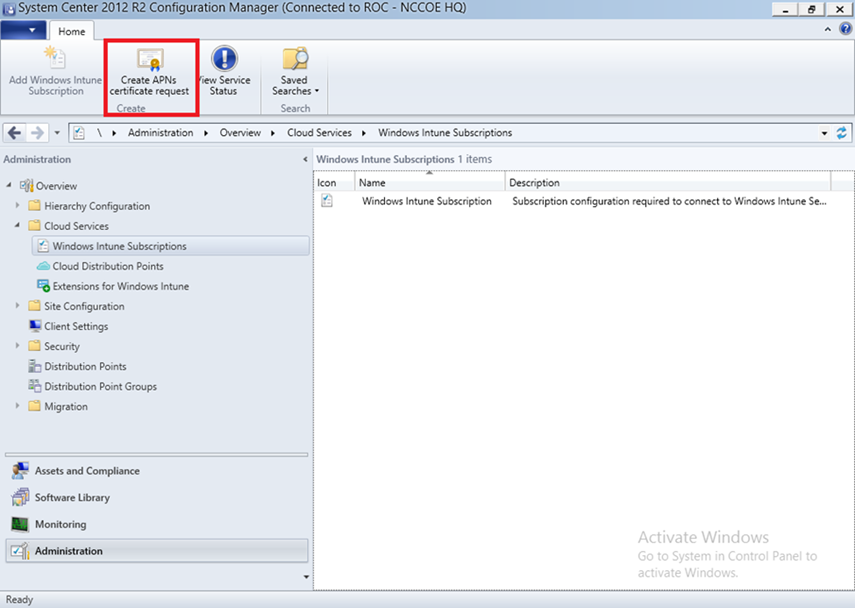
- Click Create APNs certificate request in the SCCM console
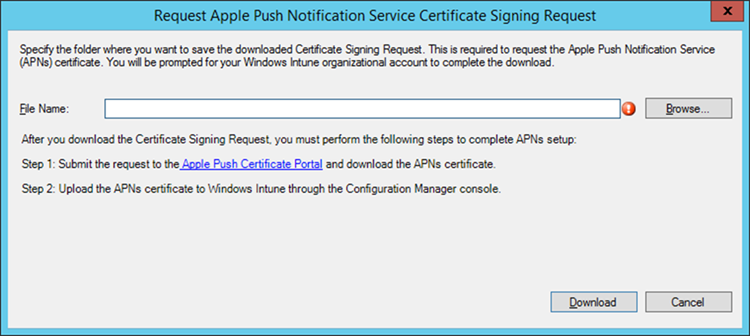
- Save the CSR to local storage. Youʼll need this file for the next step
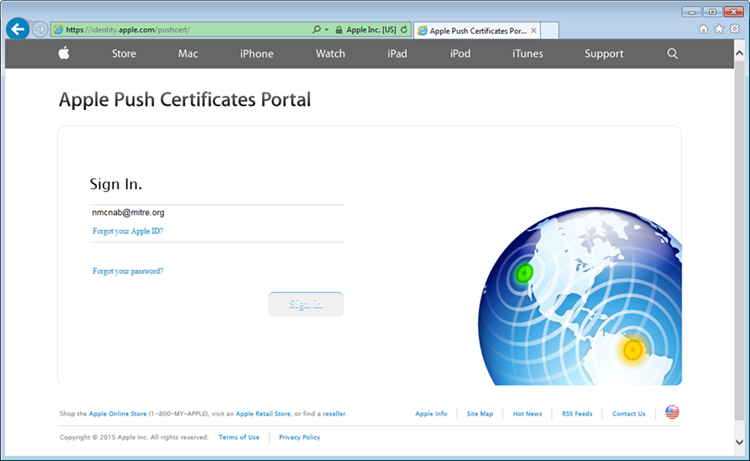
- Use a browser to visit https://identity.apple.com/pushcert/. You will be prompted for your Apple Developer account credentials.

- Once authenticated, choose Create a certificate
- Review the terms and conditions screen. You will be presented with a screen to submit your CSR. Use the Browse… button to navigate to where you stored your CSR file, and choose Upload
- After the upload, refresh the page. You will be presented with a list of signed certificates. Choose the download option for your new certificate, which will allow you to save the signed certificate in PEM format
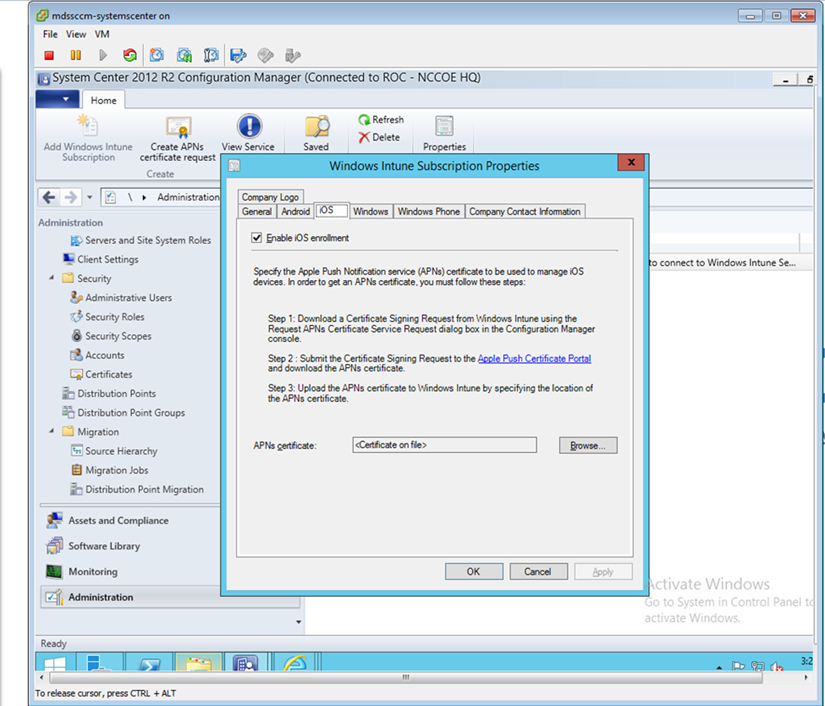
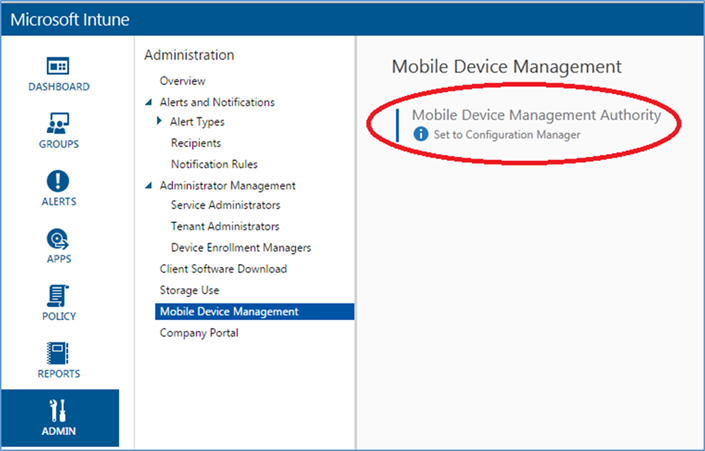
- Load the signed certificate into SCCM. Navigate to Administration > Overview > Cloud Services > Windows Intune Subscriptions. Right-click on Windows Intune Subscription and choose Properties
- Check the box to enable iOS enrollment and use the Browse… button to import the PEM certificate you downloaded from Apple. Click OK
3.2.5.4.4. Mobile Policy Creation
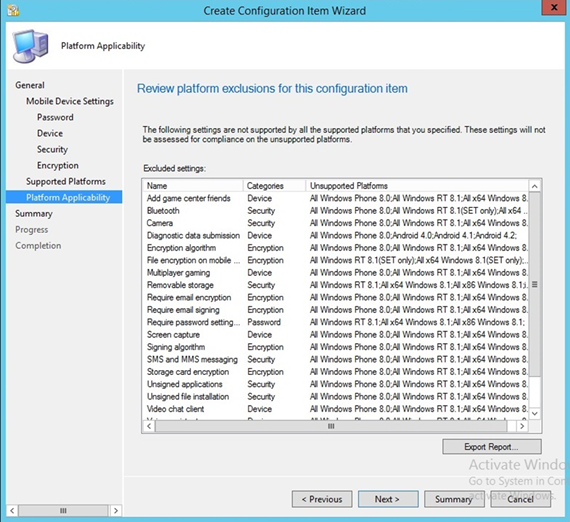
The following section depicts creation and deployment of a security policy to mobile devices in the building block test environment. The reader should note that not all options are available to every mobile operating system. Generally, iOS offers more fine-grain device management capabilities than Android; however, a KNOX-enabled Samsung Android device augments the base Android capabilities with additional management functions. More information regarding specific capabilities of supported mobile platforms can be found on TechNet [13].
- Launch the Create Configuration Item Wizard from the SCCM Configuration Manager. In the Assets and Compliance section, click Configuration Items in the Compliance Settings folder. Click Create Configuration Item from the toolbar
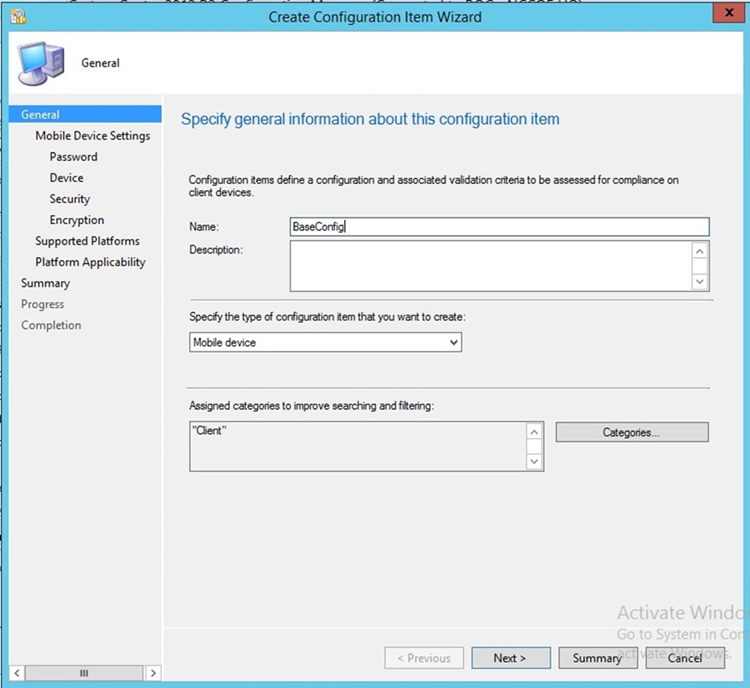
- Give the configuration a name and specify in the drop-down that this configuration item is for mobile devices. Click Categories…
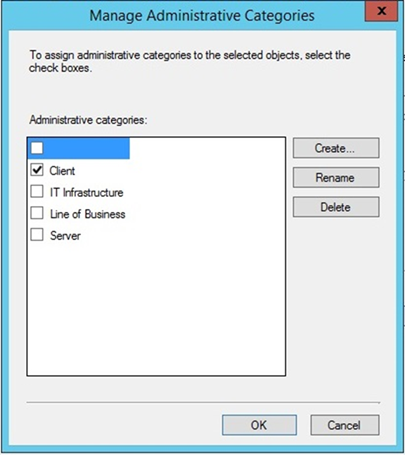
- Select the Client category. Click OK
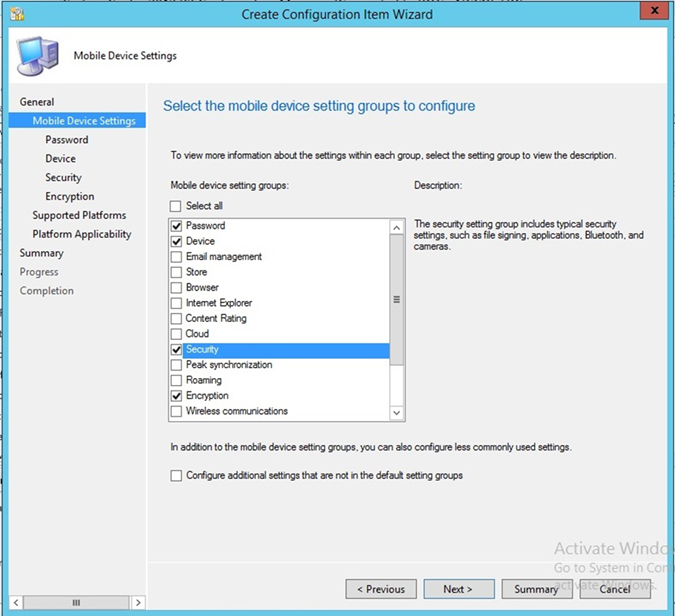
- Select Password, Device, Security, and Encryption setting groups. Click Next
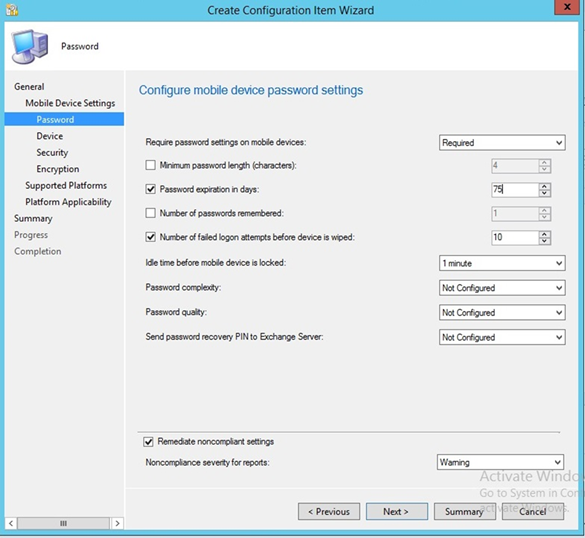
- Configure the password requirements based on your local requirements
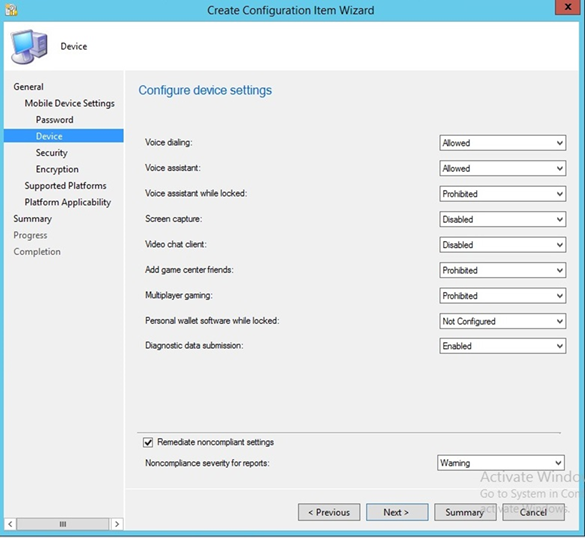
- Configure the device settings based on your local requirements
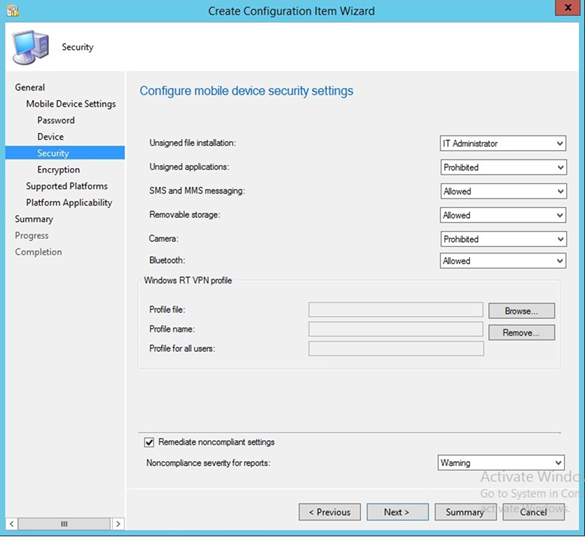
- Configure the security settings based on your local requirements
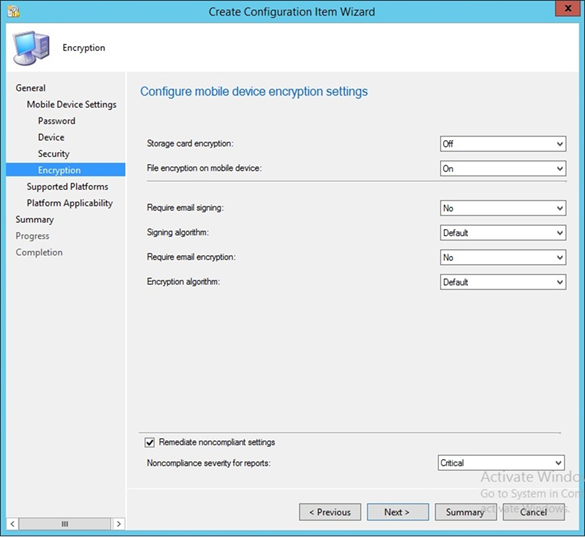
- Configure the encryption settings based on your local requirements
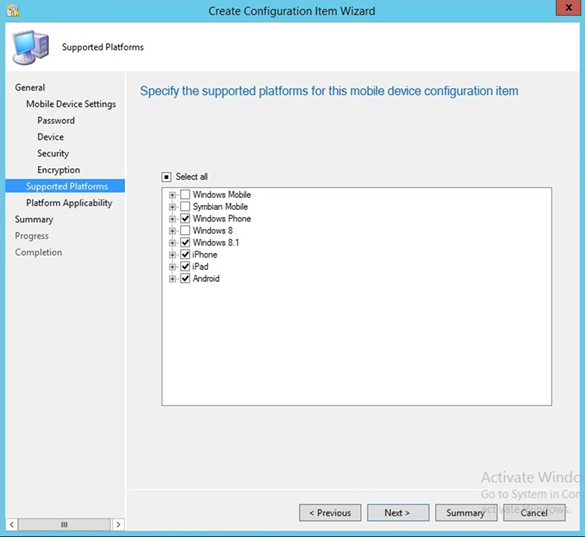
- Select the mobile platforms you wish to support. Click Next
- Click Next
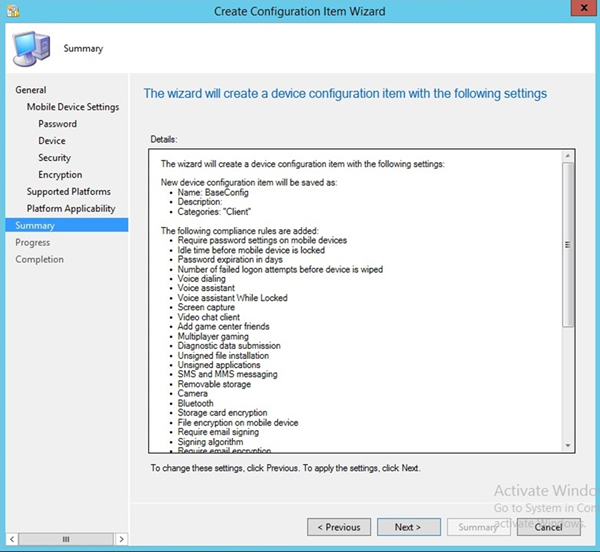
- Click Next
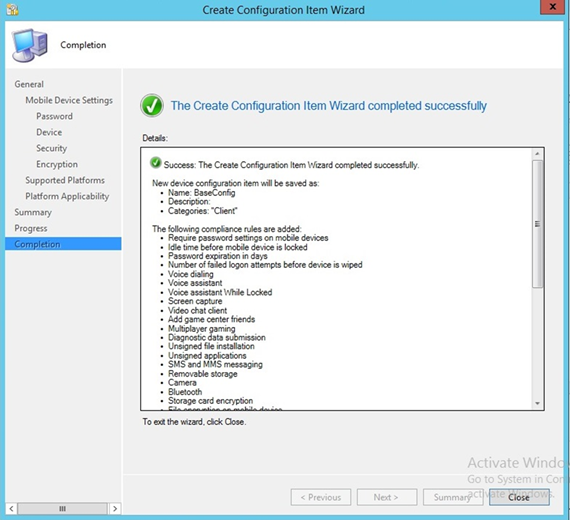
- Click Close
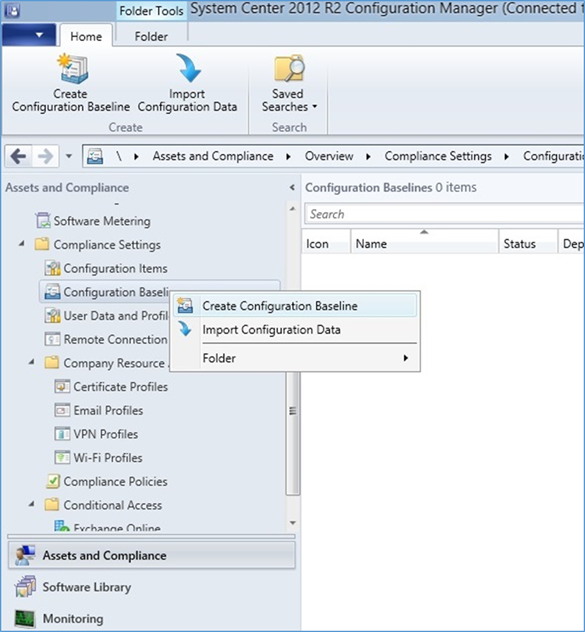
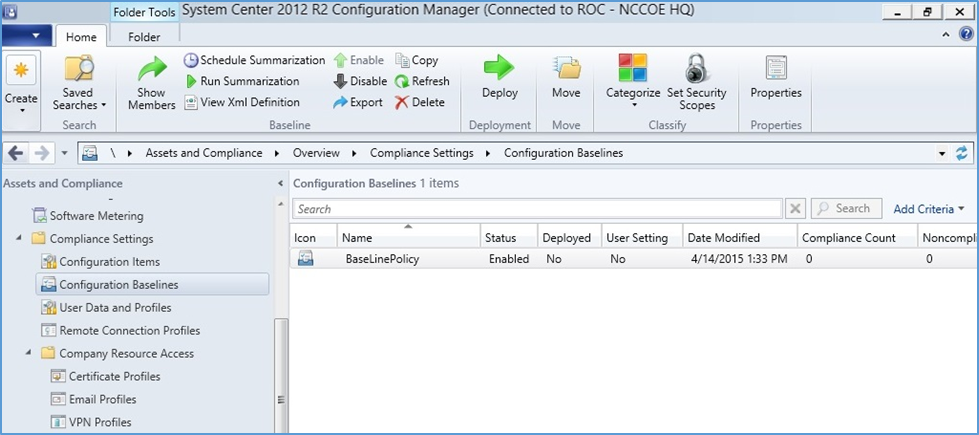
- Click Create Configuration Baseline by right-clicking Configuration Baseline from the Configuration Manager
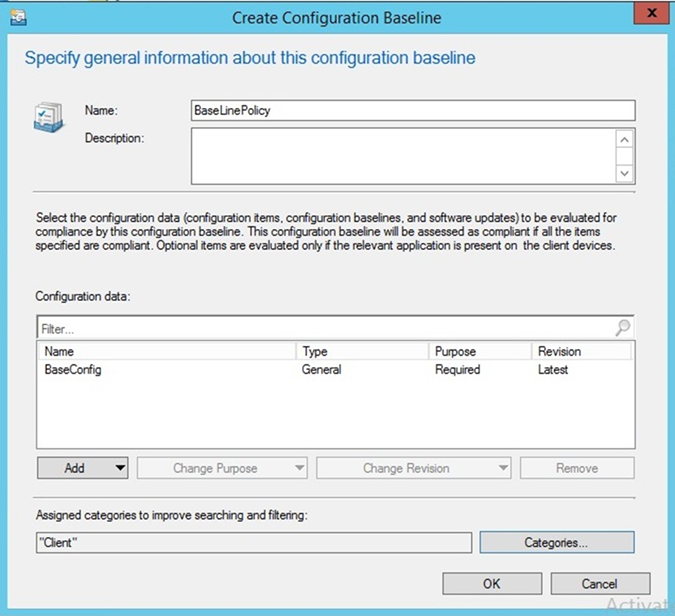
- Name the baseline policy. Add the baseline configuration created in the previous steps and click OK
3.2.5.4.5. Create Mobile Application Policy
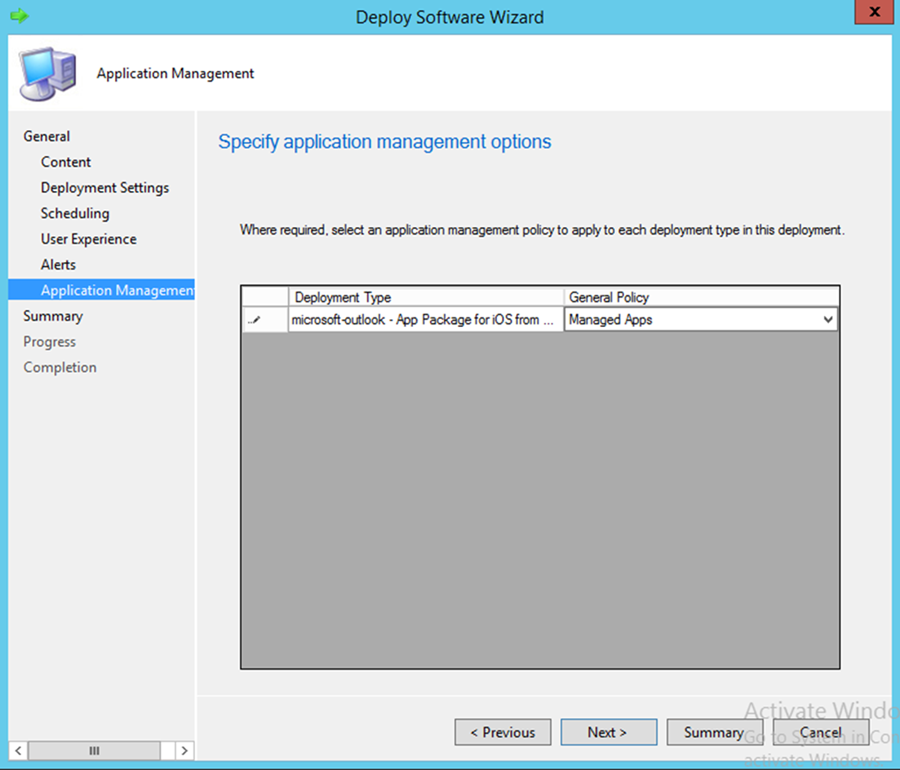
This section describes how to roll out mobile application policy for the Outlook mobile application. The policy is automatically deployed when the device owner installs the application for the first time. First, the SCCM administrator will create a new application management policy, then associate an application to the newly created policy. The following procedures feature the iOS platform, but the process is essentially the same for other platforms.
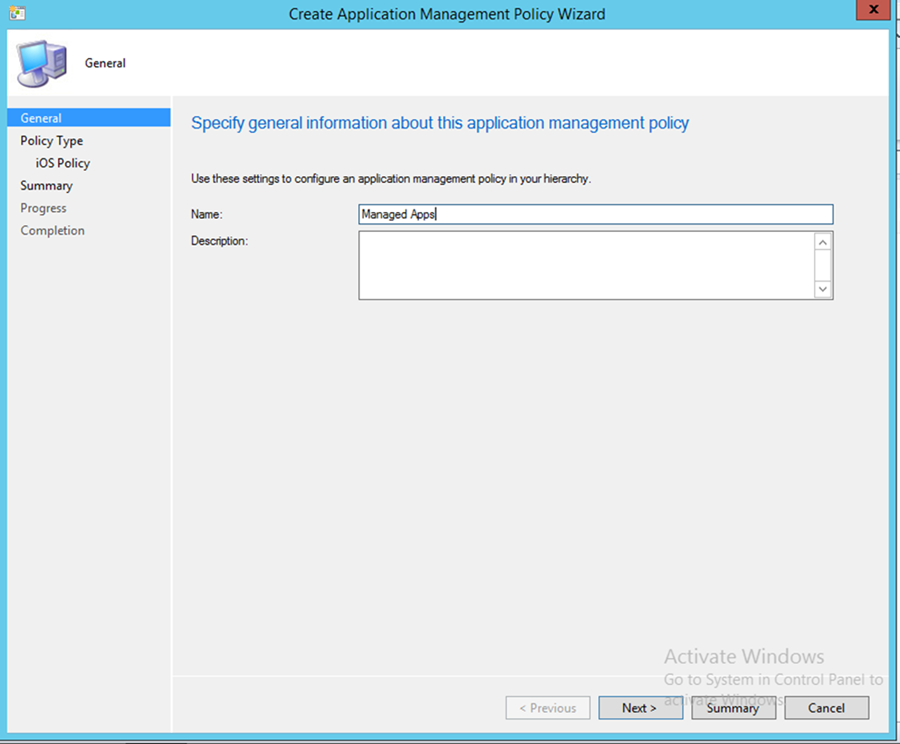
- To start the wizard, navigate to Under Software Library > Application Management > Application Management Policies: Create Policy in the SCCM console. Name the policy and click Next
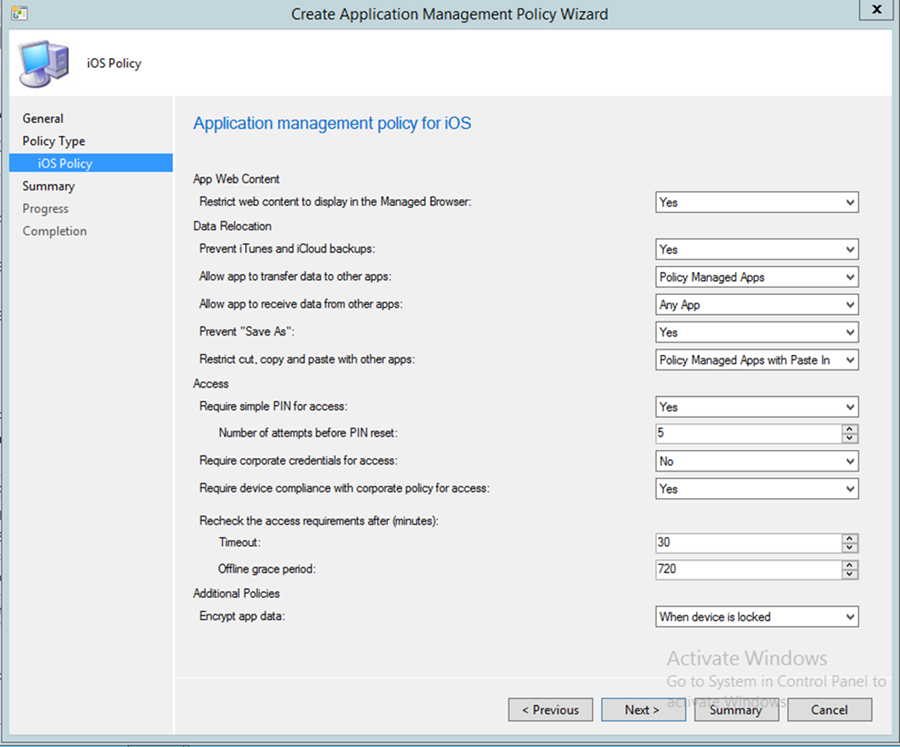
- Choose the platform type and policy type. In this example, a policy is being deployed to an iOS application. Click Next
- Set the specifics of the policy as pictured. Click Next
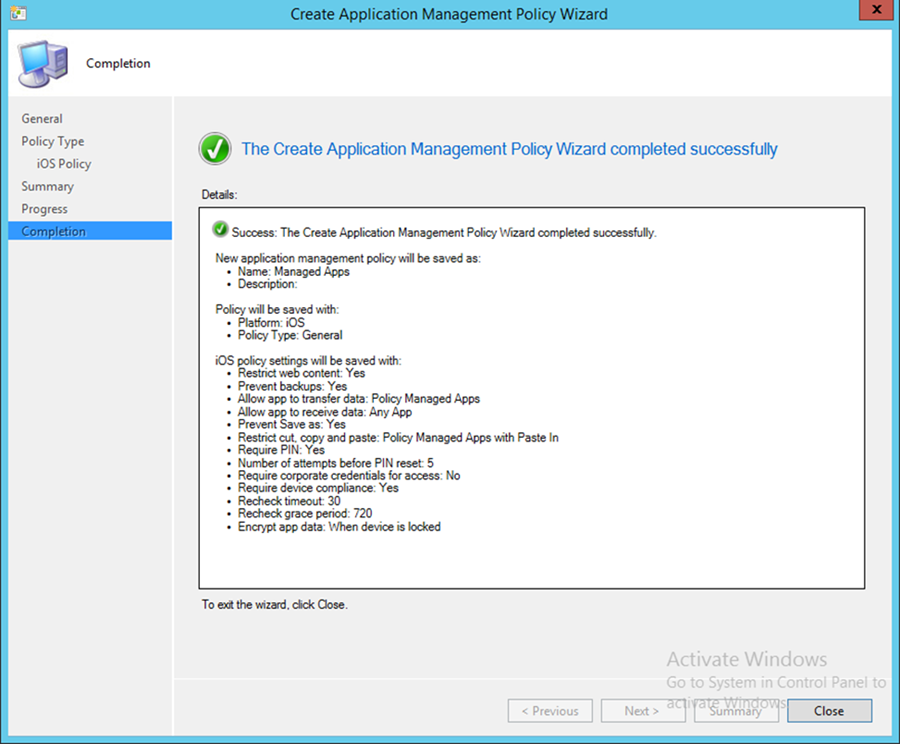
Upon successful creation, an overview is displayed. In order to use this policy, it needs to be matched with an application.
In the next section, the Outlook application is linked to the iOS application store through Company Portal and associated with the previously created application policy.
3.2.5.4.6. Link an Application to a Previously Created Mobile Application Policy
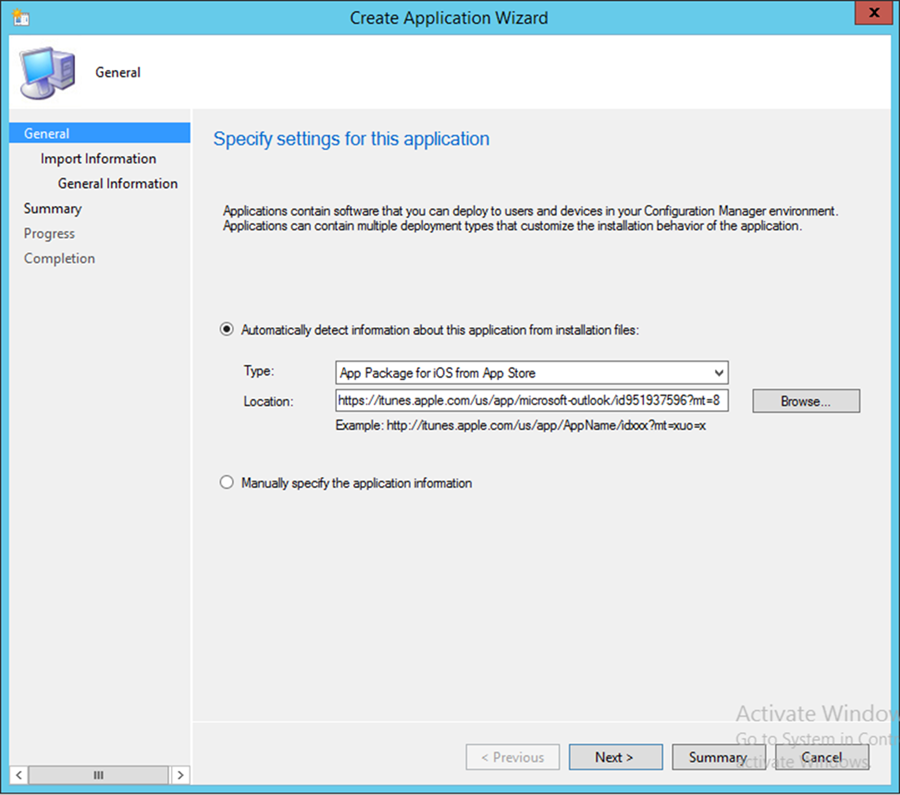
- Navigate to Software Library > Applications and Create Application. The admin will be prompted for a link to the application store application that they wish to link in the Location field. Search for the Outlook application using a search engine, and copy the link
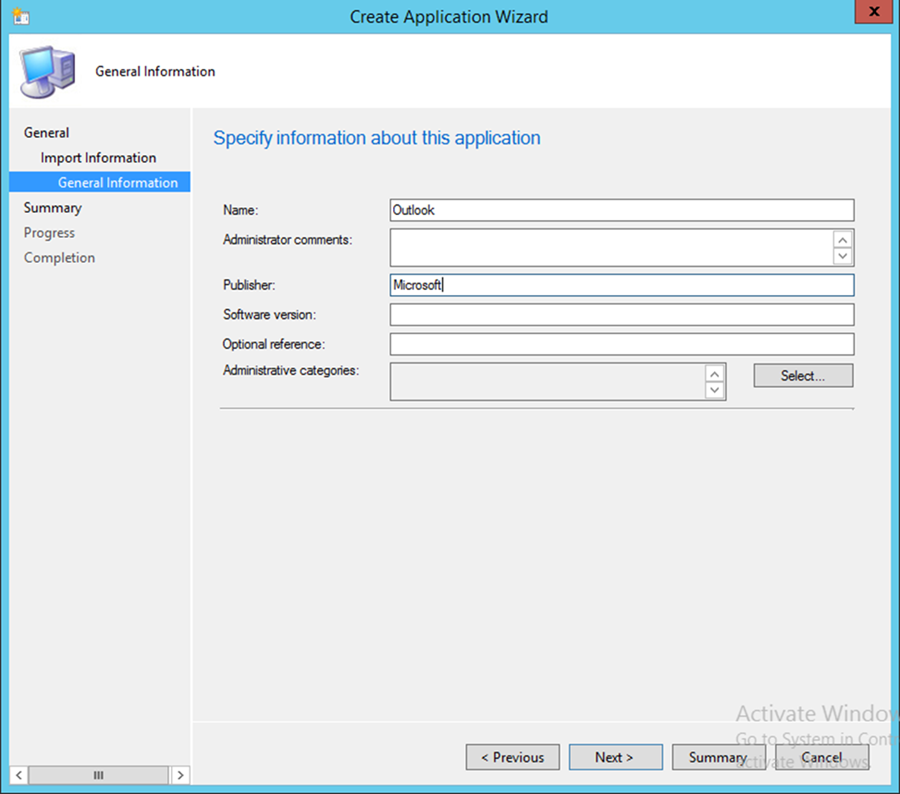
- Set the Name, Publisher, and Software version information for the application link as pictured
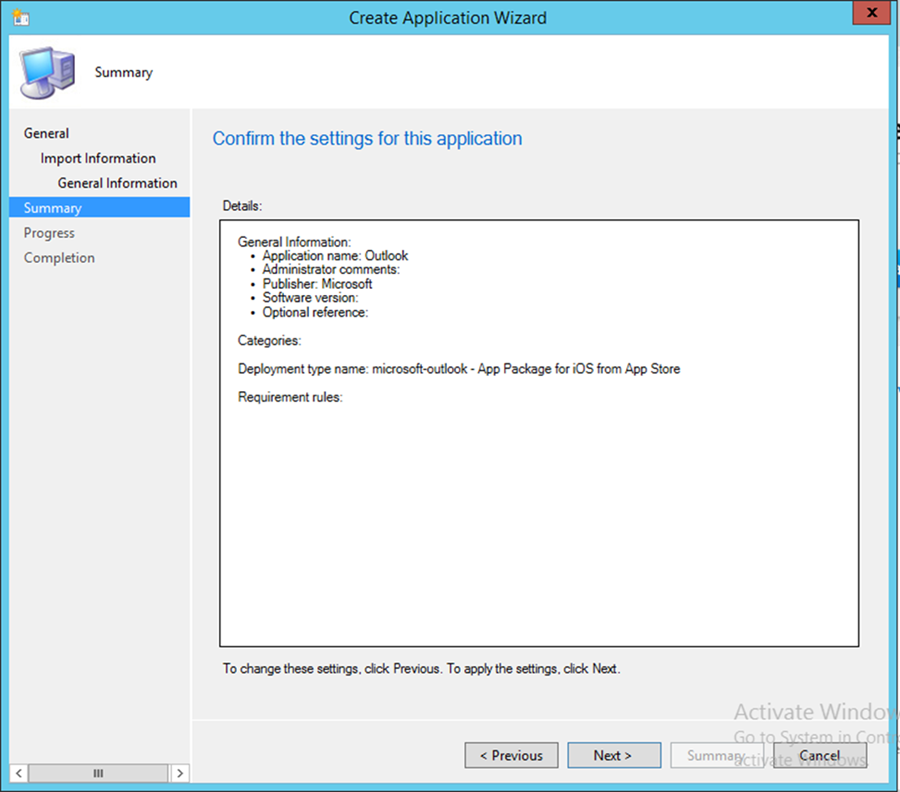
- Click Next to confirm the settings
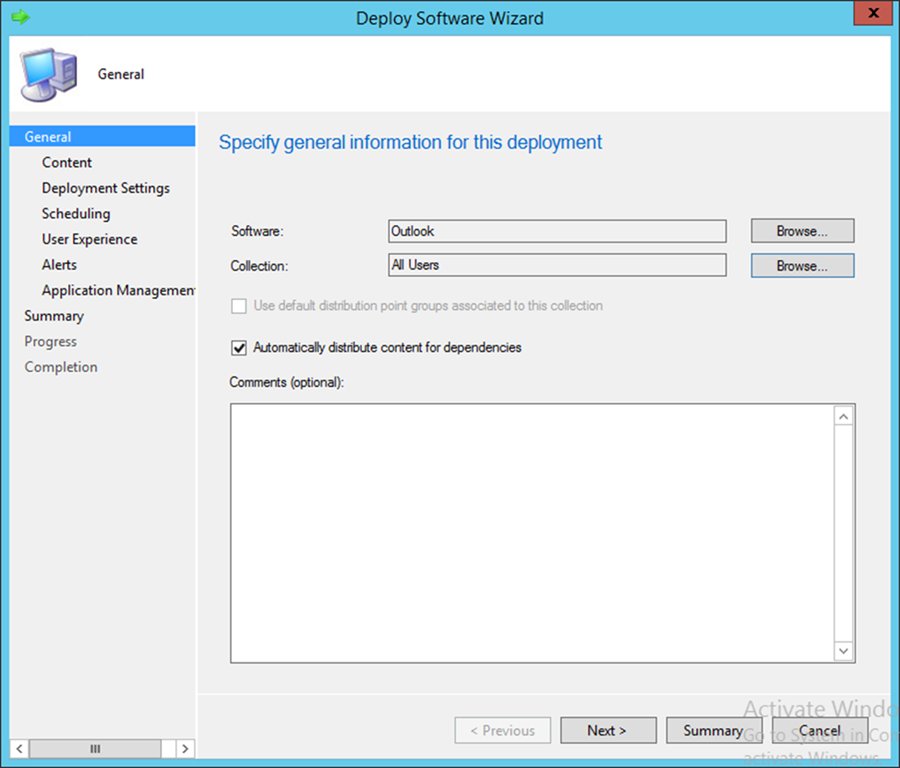
- Important: Deploy the application to a user collection instead of a device collection
- After setting the general settings for deploying the application, the admin will get a chance to link an application profile. Further configuration of the General Settings was not required for our purposes
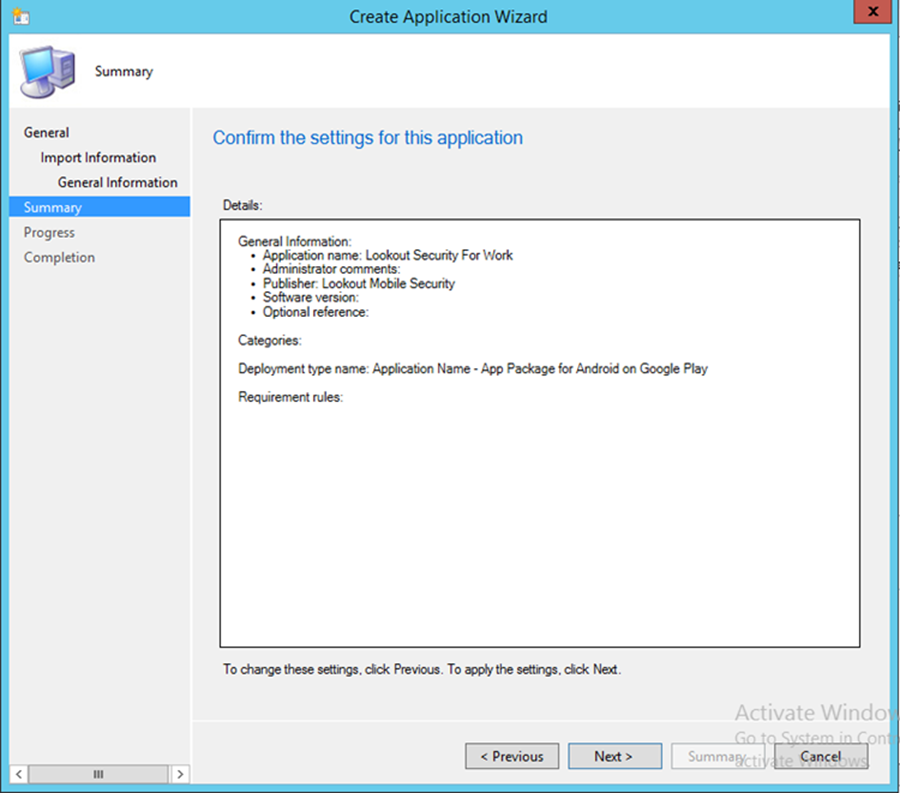
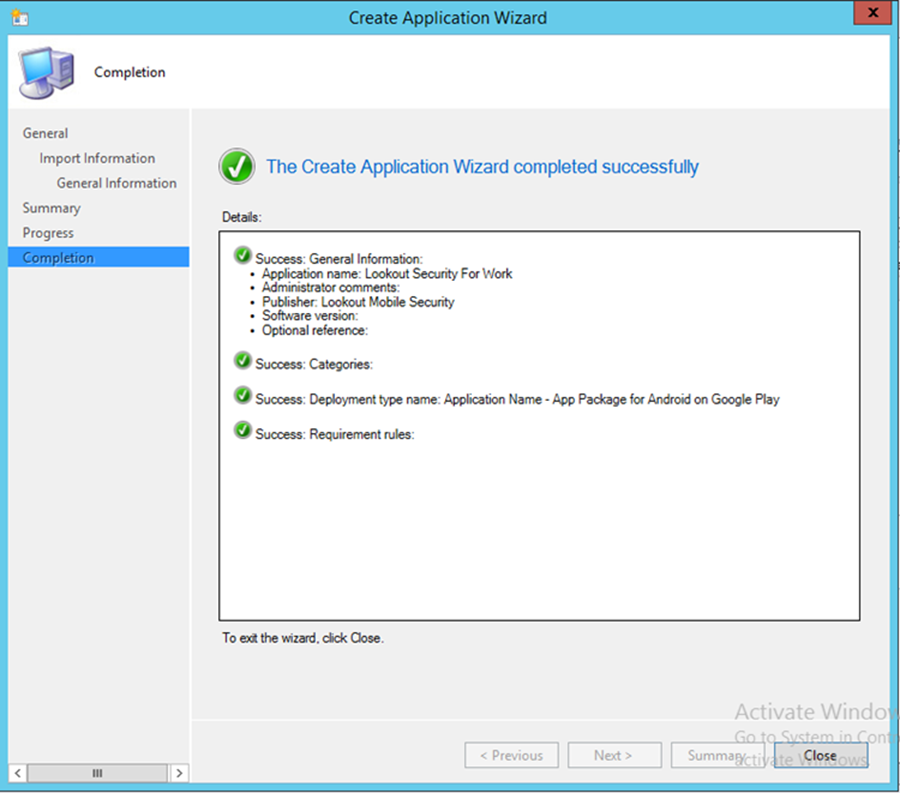
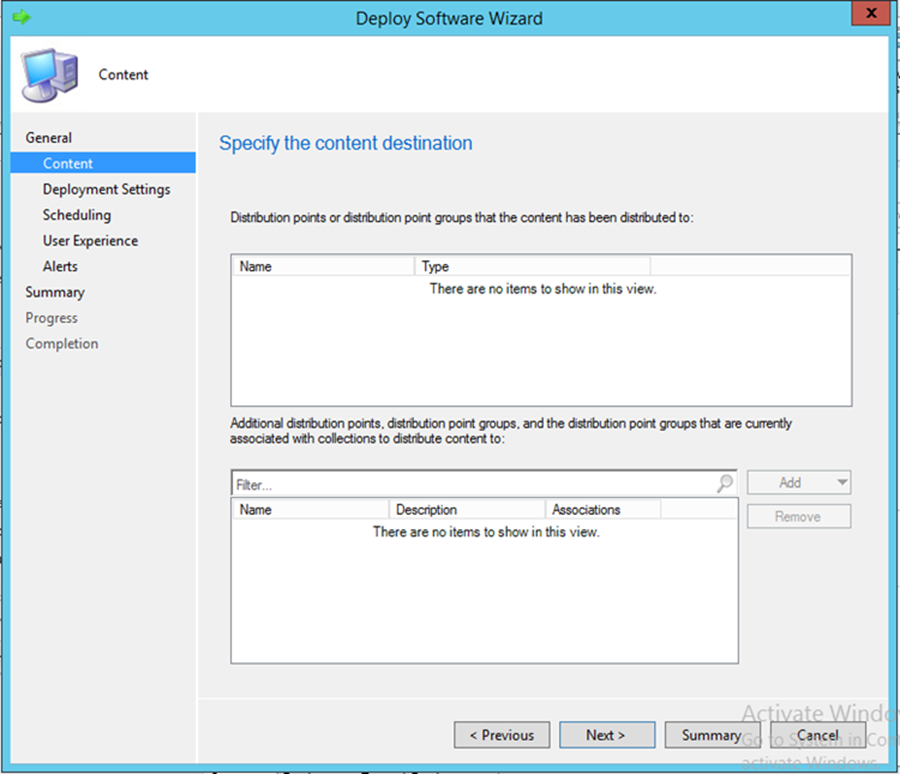
3.2.5.4.7. Configure SCCM with Lookout Application
This section describes integration of the Lookout mobile application with SCCM. When completed, the mobile device user will receive a link to download the Lookout application after enrollment with the MDM. The link URL will differ based on the mobile platform. Android users will be directed to the Google Play Store, iOS users to the App Store, and Windows Phone users to the Windows Phone store.
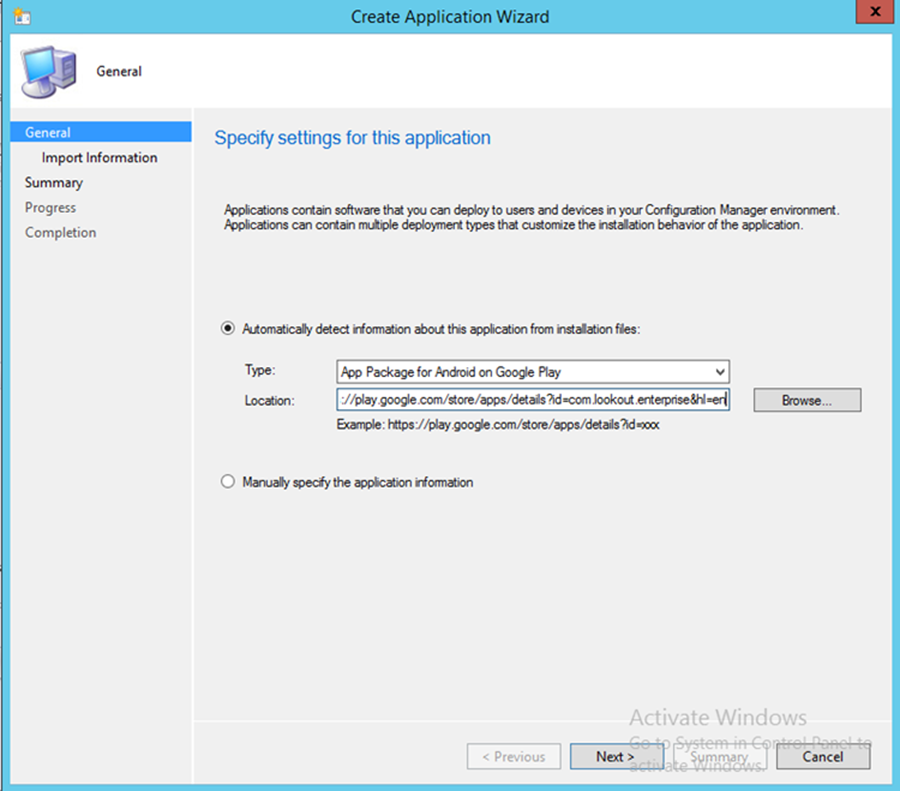
- To start the wizard, navigate to General. Select App Package for Android on Google Play in the Type drop-down. Type https://play.google.com/store/apps/details?id=com.lookout.enterprise&hl=en in the Location field.
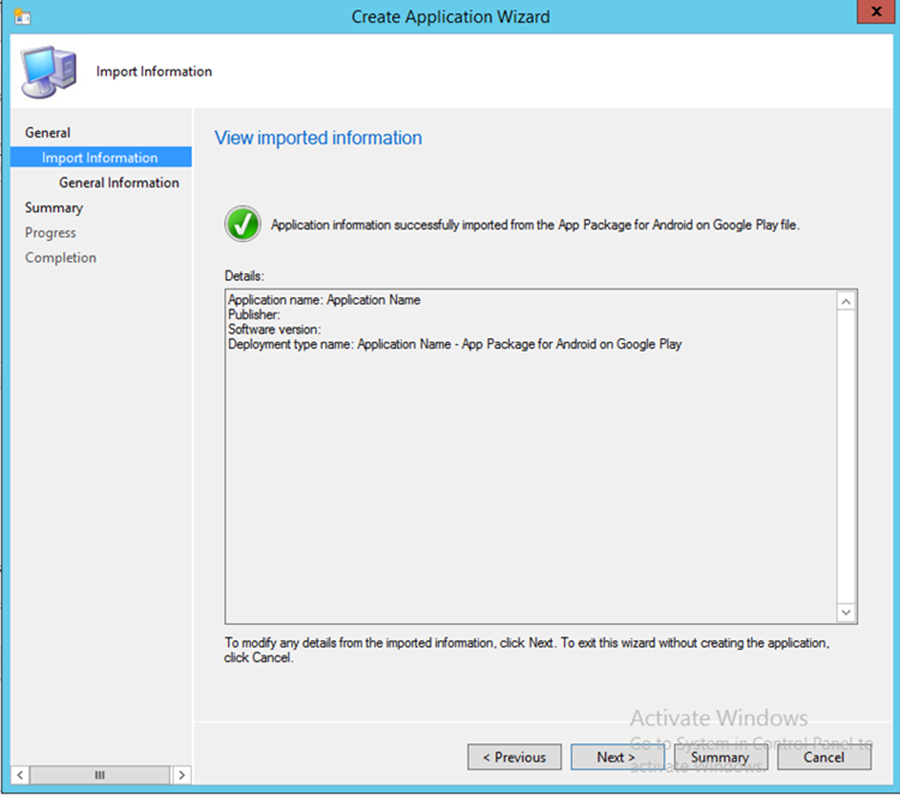
- Click Next
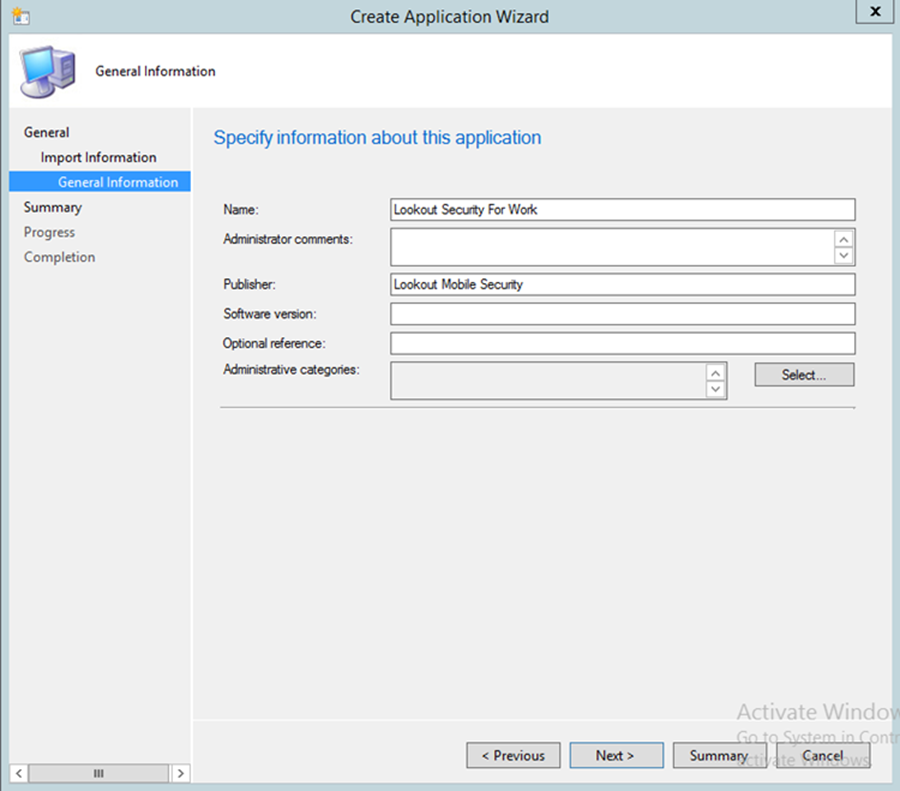
- Use the suggested text in the Name and Publisher fields. Click Next
- Click Next
- Click Close
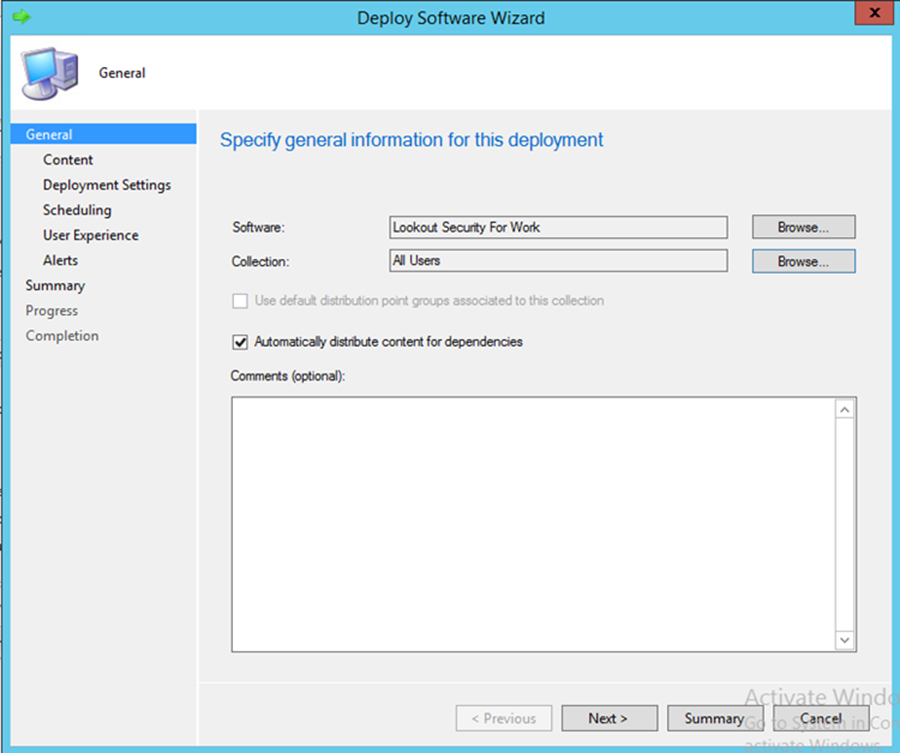
- Open the application deployment wizard. In the Software field, browse for the Lookout application. In the Collection field, browse for All Users
- Click Next
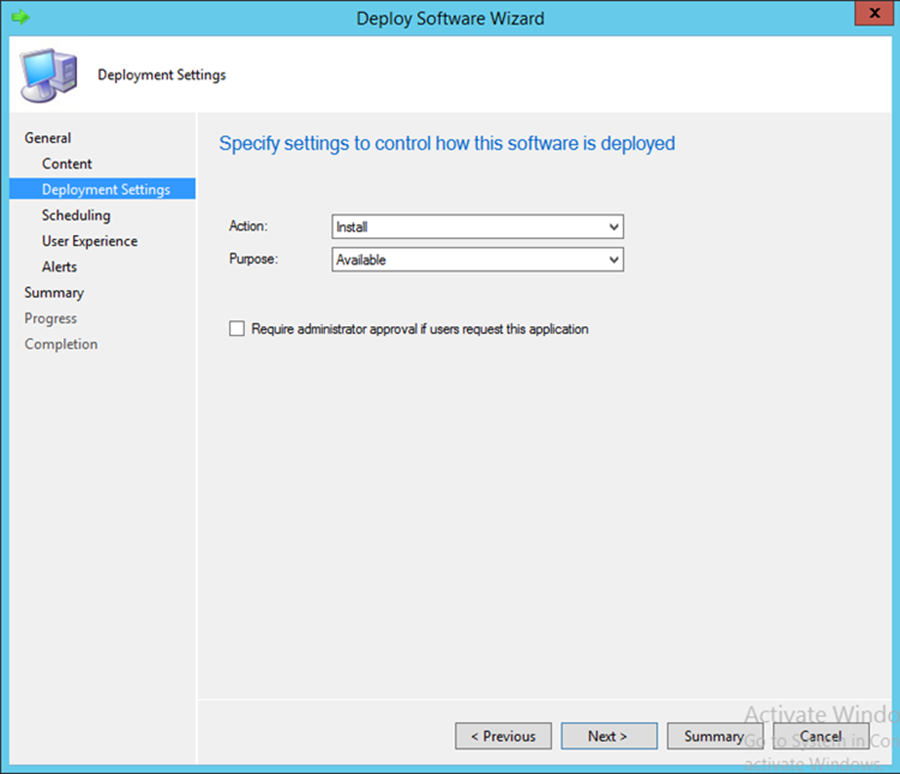
- In the Action drop-down, choose Install. In the Purpose drop-down, choose Available. Click Next
- Click Next
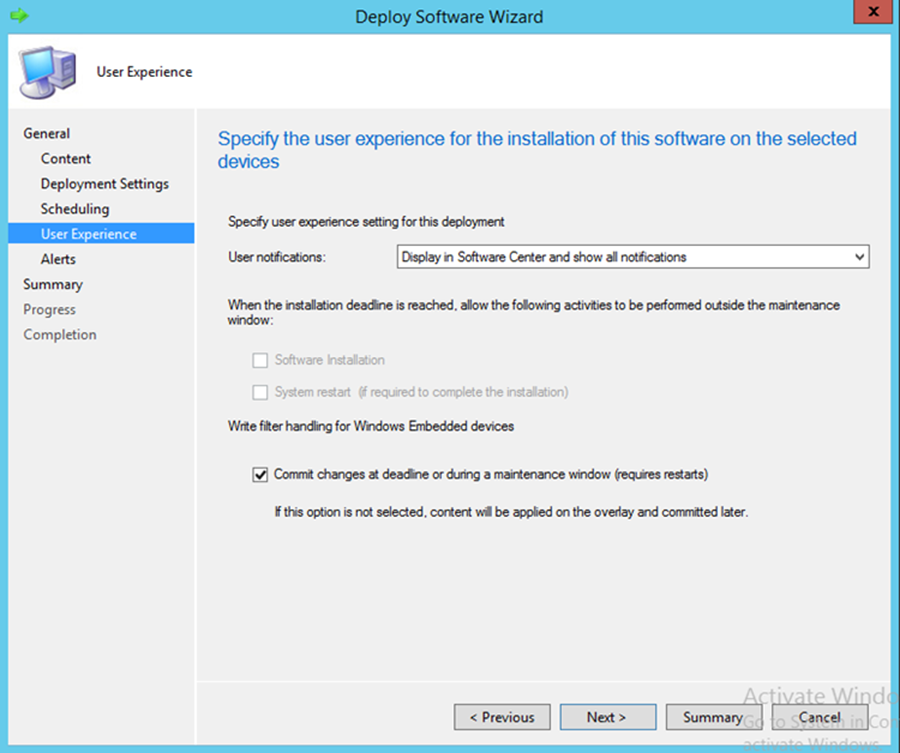
- In the User notifications drop-down, choose Display in Software Center and show all notifications
- Click Next
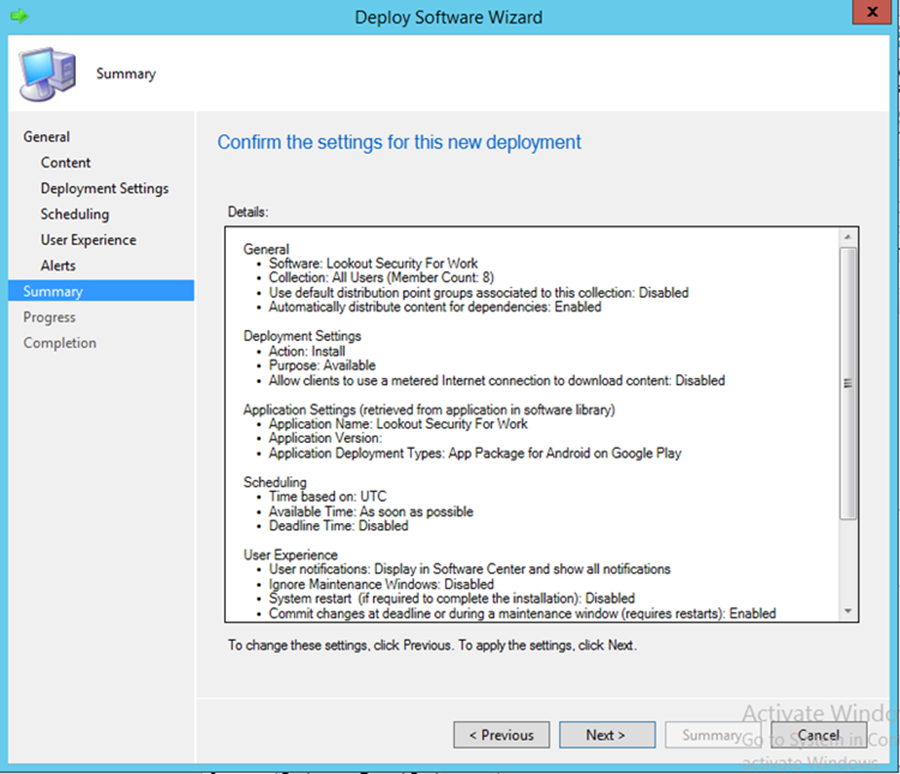
- Click Next
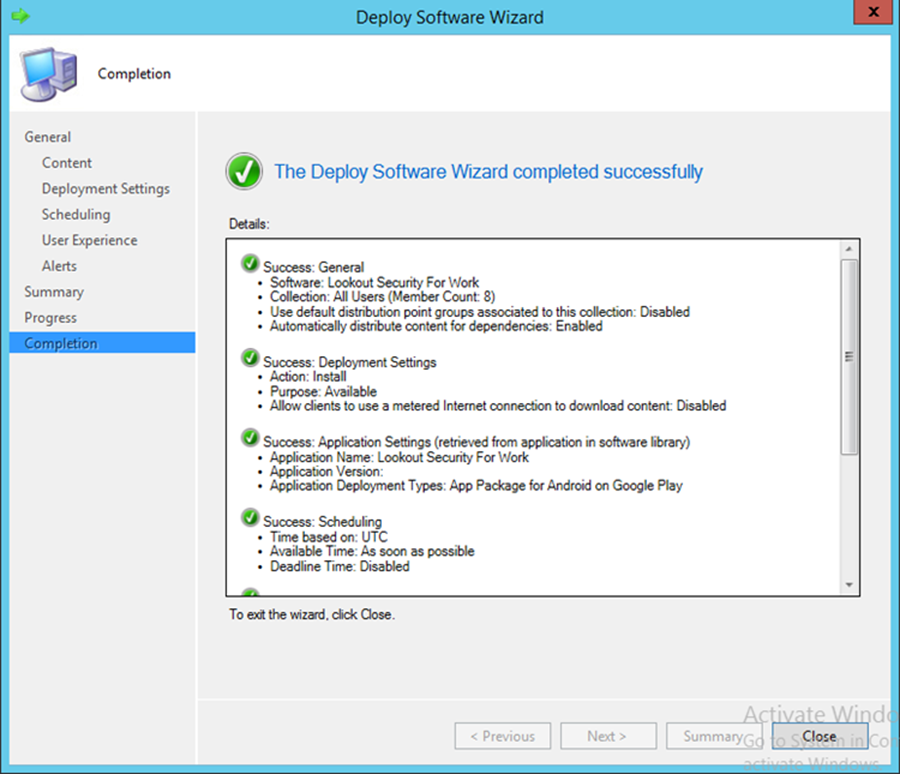
- Click Close
4. How-To: Device Configuration
The following section steps through the configuration of devices. This section is applicable to both the cloud and hybrid builds. Here, we feature enrollment and email configuration with iOS, Android, and Windows Phone operating systems.
4.1. Device Enrollment with Office 365
The following sections depict the enrollment process of an iOS and Android device to the Intune enterprise mobility management service. The reader should note that the Intune service will automatically redirect the user to the Intune tenant owner’s authentication service based on the domain part presented in the user’s email address. The authentication service must be accessible via the internet if users enroll remotely. Otherwise, an organization must make its authentication service available on a local network accessible by device users.
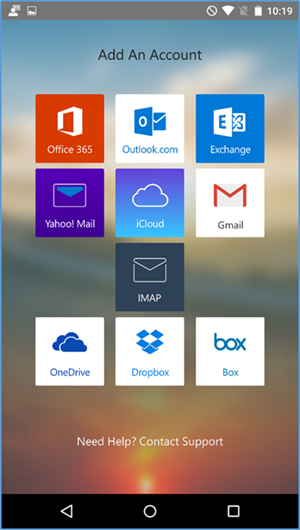
Instruct device owners to download the Company Portal application through the application distribution point of their platform to start the enrollment process. The URLs for iOS and Android devices are https://itunes.apple.com/us/app/microsoft-intune-company-portal/id719171358?mt=8 and https://play.google.com/store/apps/details?id=com.microsoft.windowsintune.companyportal&hl=en respectively. This is not necessary for Windows Phone devices because MDM management through this service is native to the device.
4.1.1. iOS
Device enrollment for iOS devices is described in the following material.

- Download the Company Portal application from the application store and log in using Office 365 credentials
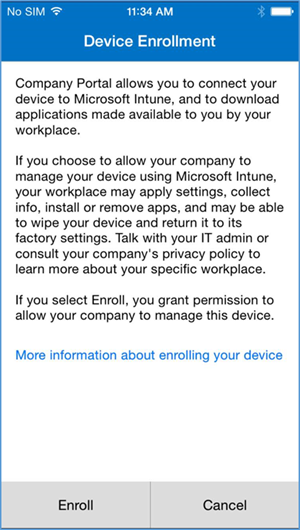
- The user will then be asked to enroll their device and accept the organization’s policies
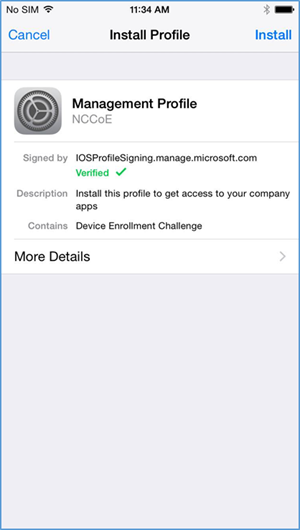
- Before accepting the management profile, the user can see the specifics of the profile and certificates that are issued

- Upon accepting the management profile, the device will be enrolled, and the user will receive this confirmation message
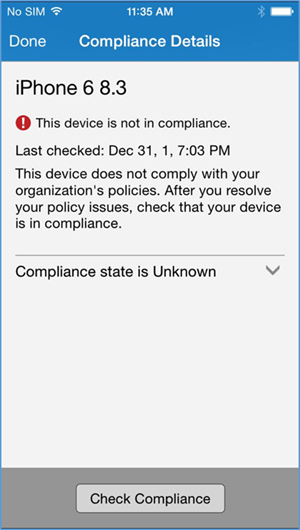
In order to gain full access to company resources, the user will need to check their device for compliance. This screen will pop up when the user taps on their device in Company Portal
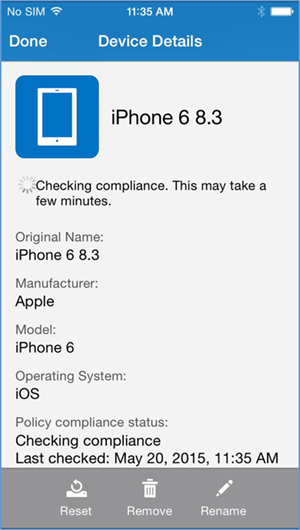
- The compliance checking process will take a couple of minutes, and the user can minimize the application during this process
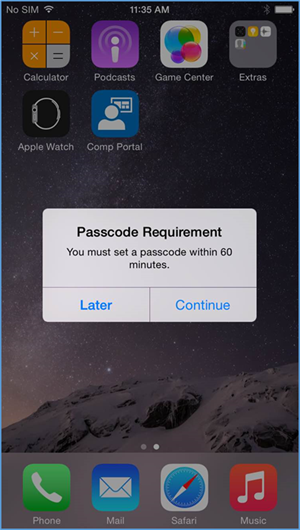
- Upon minimizing the Company Portal application during the compliance checking process, the user is presented with the password remediation process, alerting the user to change their passcode within the hour
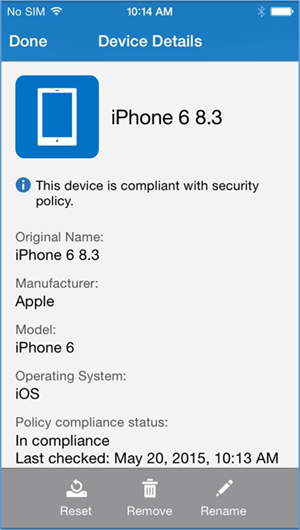
- After meeting compliance, the user’s device should be listed in the Company Portal like the example above
4.1.2. Android

- After launching the Company Portal, click Next
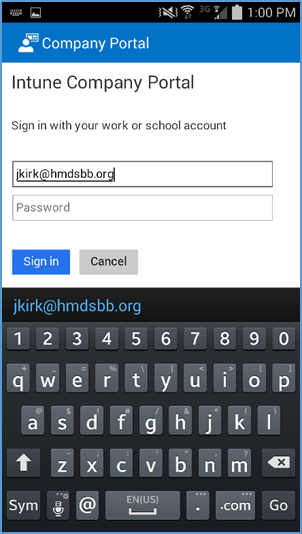
- Enter your email address

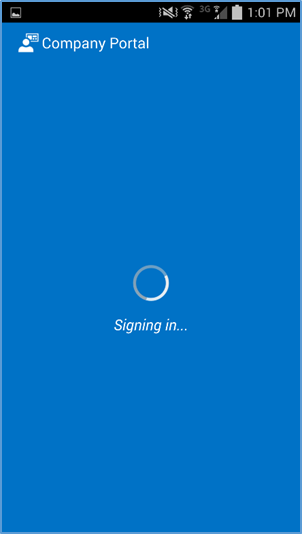
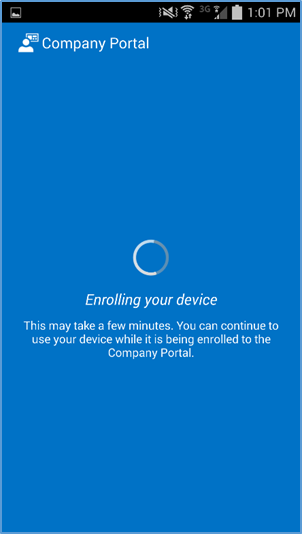
- If implementing a hybrid architecture, you will be redirected to your enterprise login site to enter your password. Otherwise, enter password and click Sign In. The user will be notified when they are signing into the Company Portal and when their device is being enrolled
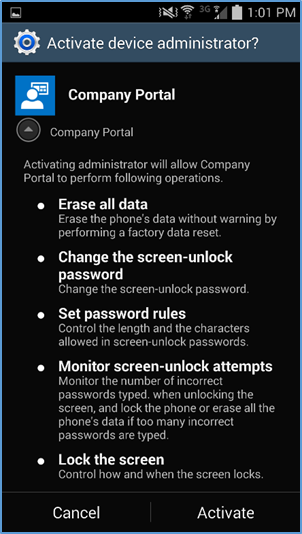
- Click Activate to allow remote management of the device
4.1.3. Windows Phone 8.1
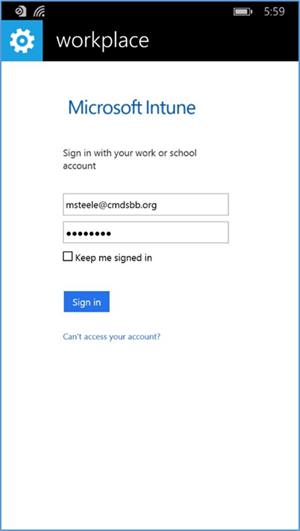
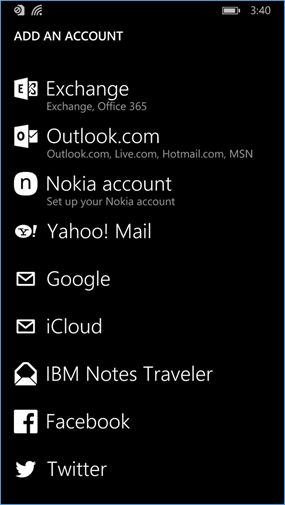
- First, the user must add a workplace to their device. To do so on Windows Phone 8 and 8.1 devices navigate to settings > system tab > workplace (WP8.1) or settings > system tab > company apps (WP8)
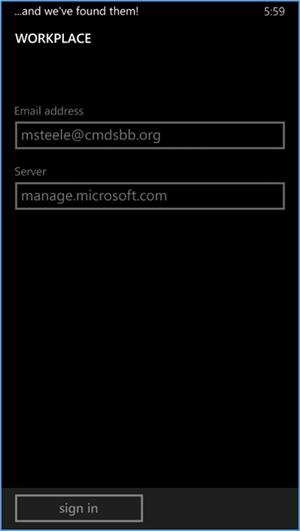
- The workplace application will attempt to connect to your company’s management portal. We used the manage.microsoft.com portal
- After connecting to your company’s portal, the device should now be able to be managed by Office 365. To do this, download Company Portal from the App Store to finish enrolling the device and receive your organization’s policies
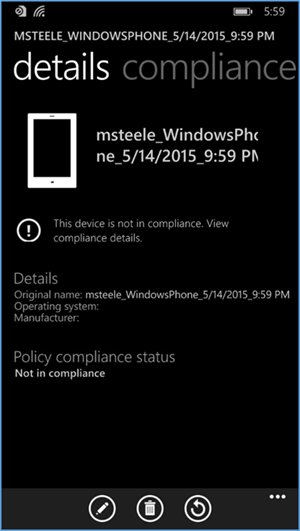
- Upon logging into Company Portal for the first time, the user will be notified that their device hasn’t met compliance and that some resources will be restricted
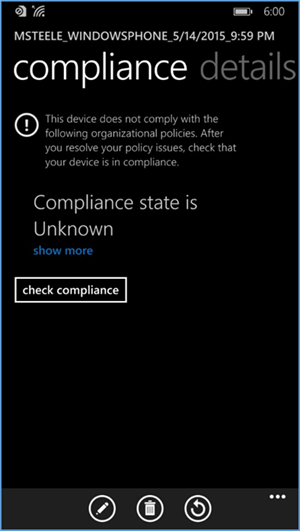
- After the user checks the compliance manually (less than five minutes), the user’s device is fully enrolled and should have the appropriate policies deployed
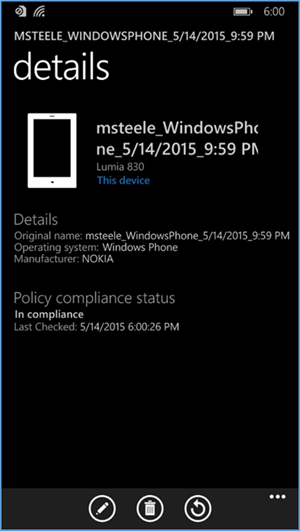
- The screenshot above displays the details and policy compliance status of how a compliant and fully enrolled device should look
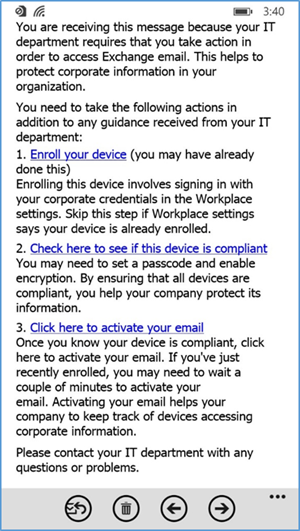
- Once compliance has been met, the user should be able to tap the activation link to activate their email access
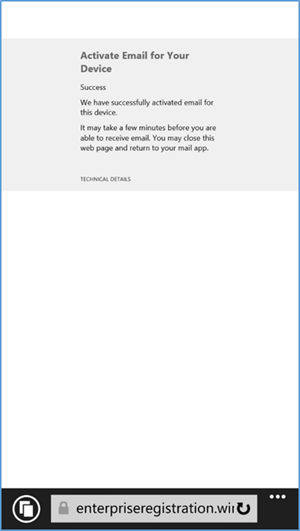
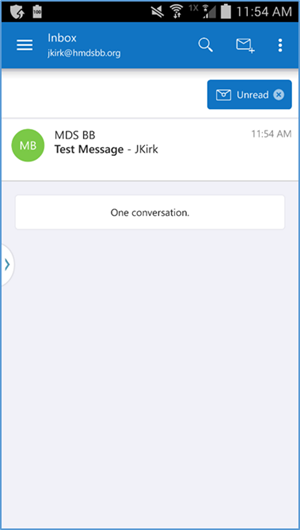
- The activation link will open a browser. Upon successful activation, the user should receive this page. At this point, the user should have full access to Exchange email/contacts/calendar
4.1.4. Email Setup
The following section steps through the setup of email clients on iOS, Android, and Windows Phone. For iOS and Android, we use the Outlook client from Microsoft in the App Store and Play Store. The native email capabilities are used with Windows Phone. Other third-party applications are available, but this guide makes no assumptions regarding the security of these applications.
Implementers may choose to have users configure an email client on their devices manually or create an SCCM profile, which automatically configures enrolled devices. At the time of writing this practice guide, only iOS and Microsoft mobile devices were supported. Consult SCCM documentation for the latest capabilities.
4.1.4.1. iOS
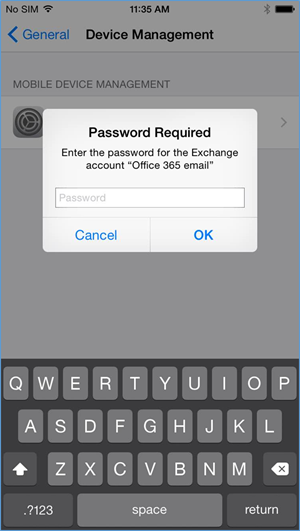
- When the user first opens the settings application — before, during, or after the compliance check — they are prompted for their Office 365 password for the Exchange profile that is provisioned during the onboarding process. (This is a onetime occurrence)
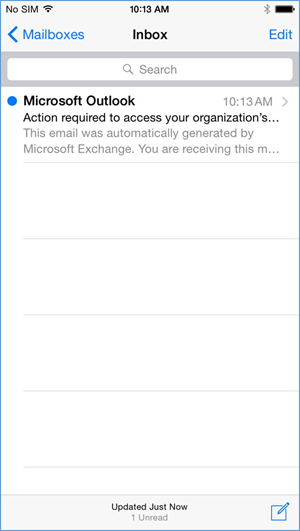
- The user will receive this email the first time they open their email client
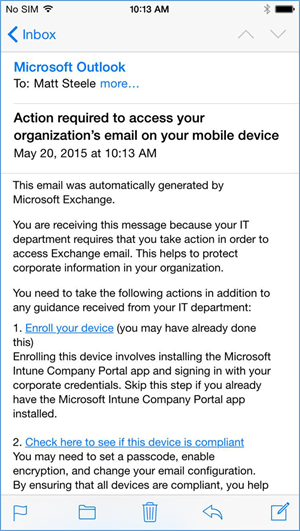
- To activate their email access, the user will have to tap the link to activate the email and check for compliance
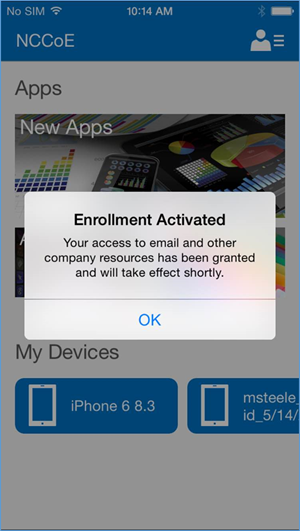
- After activating their email, the user will be presented with an enrollment activated confirmation page
4.1.4.2. Android
- Open the Outlook application on your device
- Choose Office 365
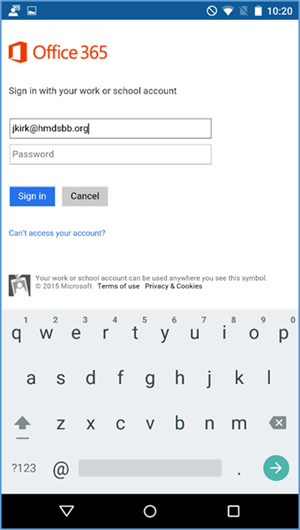
- Log in with your enterprise credentials
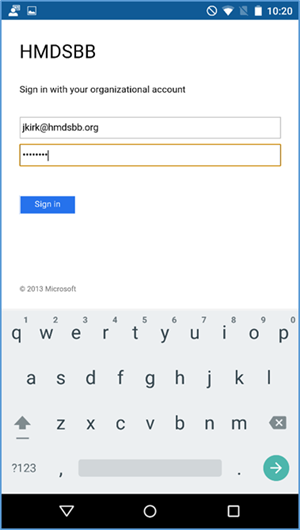
- Note that if you are using the hybrid build, a single sign-on workflow is initiated. The device owner will be redirected to their local sign-in service

- If the device has not been enrolled with the MDM, a prompt is presented to do so
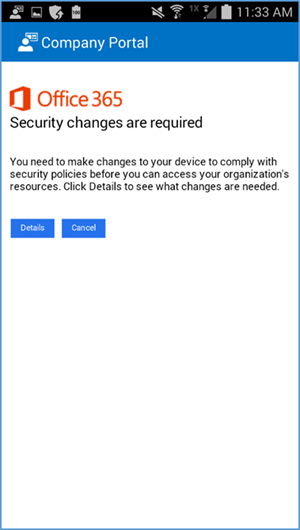
- A device that is out of compliance with the MDM policy will not have access to Office 365 services. The device owner is forced to remediate the device
The device owner is granted access to Office 365 after the device complies with policy
4.1.4.3. Windows Phone 8.1
- To get full access to Exchange resources as well as email, use the built-in email client to add an Exchange account. In the email client, tap the three horizontal dots on the bottom right and tap add account to bring up the account select page. Or under settings > email+ accounts add the Office 365 Exchange account credentials
- Log in using Office 365 credentials; the server information should auto-populate
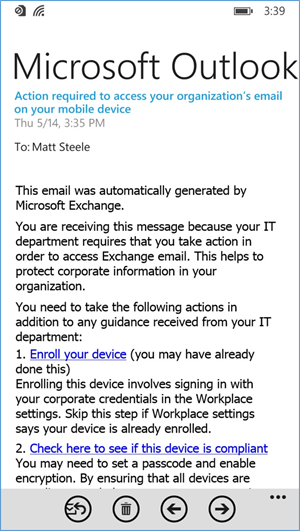
- Upon successfully syncing the Exchange account, an email explaining the enrollment process should be received requesting that the user enroll/check for compliance
4.1.4.4. Windows 8.1
Email profiles for Windows Mobile 8.1 were configured using the following steps.
- The user can add their account to the built-in email application by selecting Exchange account and adding their email@customdomain and password. The email application should be able to pull the settings

- Upon connecting to their Exchange account, the user should receive an email asking them to activate their email by clicking the link to check compliance
4.1.5. Lookout MTP Enrollment
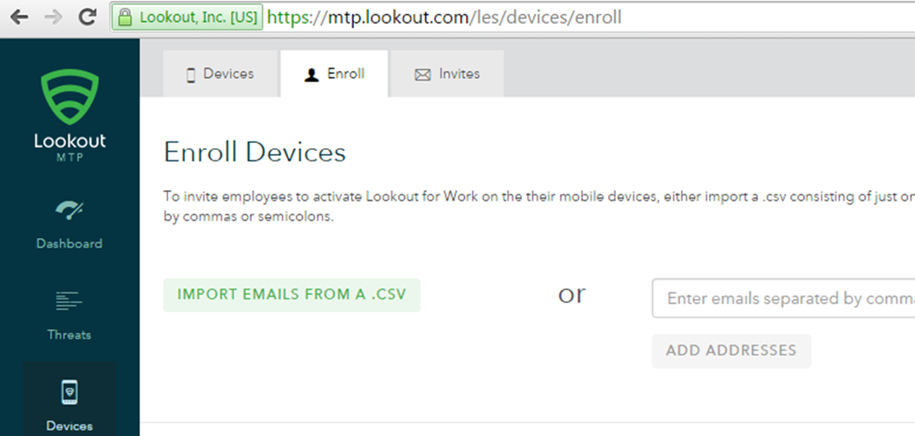
- Open the Lookout Mobile Threat Protection (MTP) administrative console with a browser. Navigate to https://mtp.lookout.com/les/devices/enroll and type the target user’s email address into the provided web field
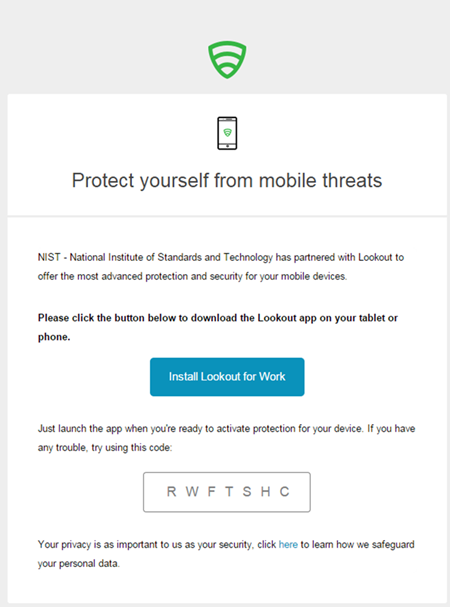
- The mobile device user will receive an email with an activation code that must be used to activate the application
4.1.5.1. Android
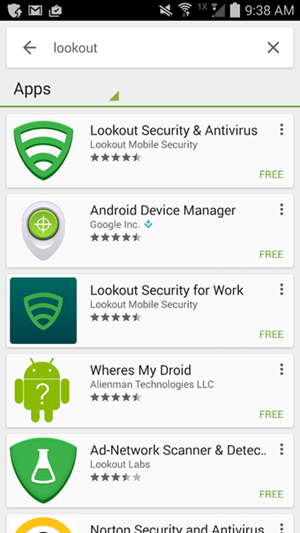
- Find the MTP application from the Google Play Store by searching “lookout”
- Select the Lookout Security for Work application
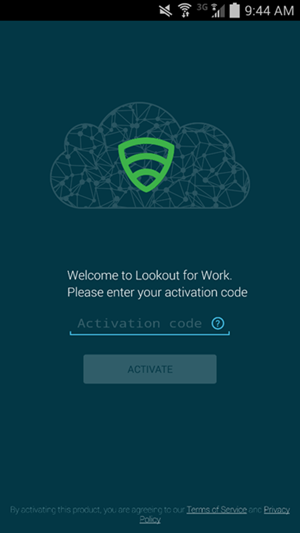
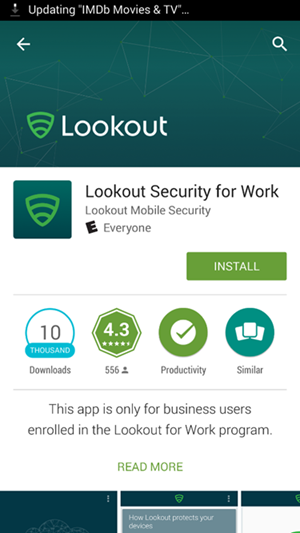
- Enter the activation code retrieved from the enrollment email
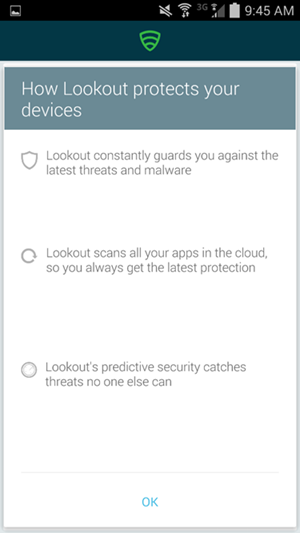
- Select OK after the activation code is validated
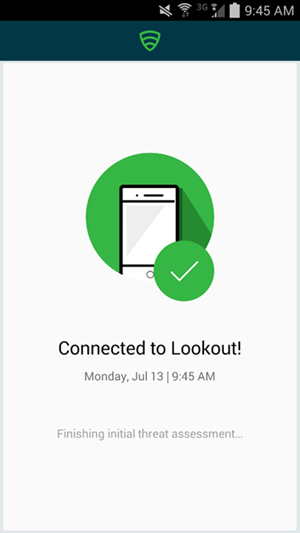
- The application will proceed to scan the device.
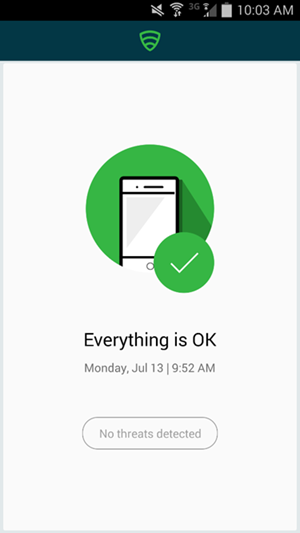
- The application notifies the user of any threats on the device
Appendix A List of Acronyms
| AD | Active Directory |
| ADDS | Active Directory Domain Service |
| ADFS | Active Directory Federation Services |
| APN | Apple Push Notification |
| BYOD | Bring Your Own Device |
| COPE | Corporately Owned, Personally Enabled |
| DMZ | Demilitarized Zone |
| DNS | Domain Name System |
| EMM | Enterprise Mobility Management |
| HTTP | Hypertext Transfer Protocol |
| HTTPS | Hypertext Transfer Protocol Secure |
| ISP | Internet Service Provider |
| LAN | Local Area Network |
| MDM | Mobile Device Management |
| MDS | Mobile Device Security |
| MGMT | Management Network |
| MTP | Mobile Threat Protection |
| NCCoE | National Cybersecurity Center of Excellence |
| NIST | National Institute of Standards and Technology |
| NSA | National Security Agency |
| OU | Organizational Unit |
| PEM | Privacy Enhanced Mail |
| SCW | Security Configuration Wizard |
| SP | Special Publication |
| SSL | Secure Sockets Layer |
| TLS | Transport Layer Security |
| UPN | User Principal Name |
| WAN | Wide Area Network |
| WAP | Wireless Access Point |
Appendix B References
| [1] | International Data Corporation, Android and iOS Squeeze the Competition, Feb. 24, 2015. Available: https://www.businesswire.com/news/home/20150224006498/en/Android-iOS-Squeeze-Competition-Swelling-96.3-Smartphone . |
| [2] | Internet Corporation for Assigned Names and Numbers-Accredited Registrars, Dec. 11, 2018. Available: https://www.icann.org/registrar-reports/accredited-list.html. |
| [3] | Apple website for pricing information and more details regarding certificates. Available: https://developer.apple.com/. |
| [4] | Microsoft, “Plan for third-party SSL certificates for Office 365,” Oct. 23, 2017. Available: https://support.office.com/en-sg/article/Plan-for-third-party-SSL-certificates-for-Office-365-b48cdf63-07e0-4cda-8c12-4871590f59ce?ui=en-US&rs=en-SG&ad=SG. |
| [5] | Microsoft, “Understanding Certificate Requirements,” July 22, 2014. Available: https://docs.microsoft.com/en-us/previous-versions/exchange-server/exchange-141/gg476123(v=exchg.141) . |
| [6] | Microsoft, “Install Active Directory Domain Services (Level 100),” May 30, 2017. Available: https://technet.microsoft.com/en-us/library/hh472162.aspx. |
| [7] | Microsoft, “Use a lab environment for your devops,” May 1, 2017. Available: https://docs.microsoft.com/en-us/visualstudio/test/lab-management/using-a-lab-environment-for-your-application-lifecycle?view=vs-2017. |
| [8] | Microsoft, “How To Install ADFS 2012 R2 For Office 365,” Apr. 28, 2014. Available: http://blogs.technet.com/b/rmilne/archive/2014/04/28/how-to-install-adfs-2012-r2-for-office-365.aspx. |
| [9] | (1, 2) Microsoft, Office 365 and ADFS…Active Directory Federation Service Installation, Feb. 10, 2018. Available: https://social.technet.microsoft.com/wiki/contents/articles/9082.office-365-and-adfs-active-directory-federation-service-installation.aspx?Redirected=true . |
| [10] | Microsoft, Test Lab Guide: System Center 2012 Configuration Manager. Available: https://www.microsoft.com/en-us/download/confirmation.aspx?id=30443. |
| [11] | Microsoft, Azure Active Directory Sync, Nov. 8, 2015. Available: https://msdn.microsoft.com/en-us/library/azure/dn790204.aspx. |
| [12] | Microsoft, Geek of All Trades: Office 365 SSO: A Simplified Installation Guide, Aug. 30. 2016. Available: https://docs.microsoft.com/en-us/previous-versions/technet-magazine/jj631606(v=msdn.10) . |
| [13] | Microsoft, Manage settings and features on your devices with Intune policies, June 13, 2018. Available: https://technet.microsoft.com/en-us/library/dn913730.aspx. |